

Heartwood Hotel is a sweet book series about a little hotel in a tree for animals. Located in the Fernwood Forest, animals big and small visit the hotel for the safety, luxury, and comfort. The hotel’s motto is “We live by protect and respect, not by tooth and claw.” The book’s main character, Mona the mouse is in search of a new home after her house was swept away in a big storm. She stumbles upon the hotel and meets many new friends and faces some dangers too.
My girls recently participated in a Literature Fair with other local homeschoolers. Each child or family chose a book and made a display and talked about their book. I suggested to my girls to make an actual Heartwood Hotel. They were beyond excited! They helped make the majority of the tree. The only parts I did were the cutting of the boxes.
Supplies

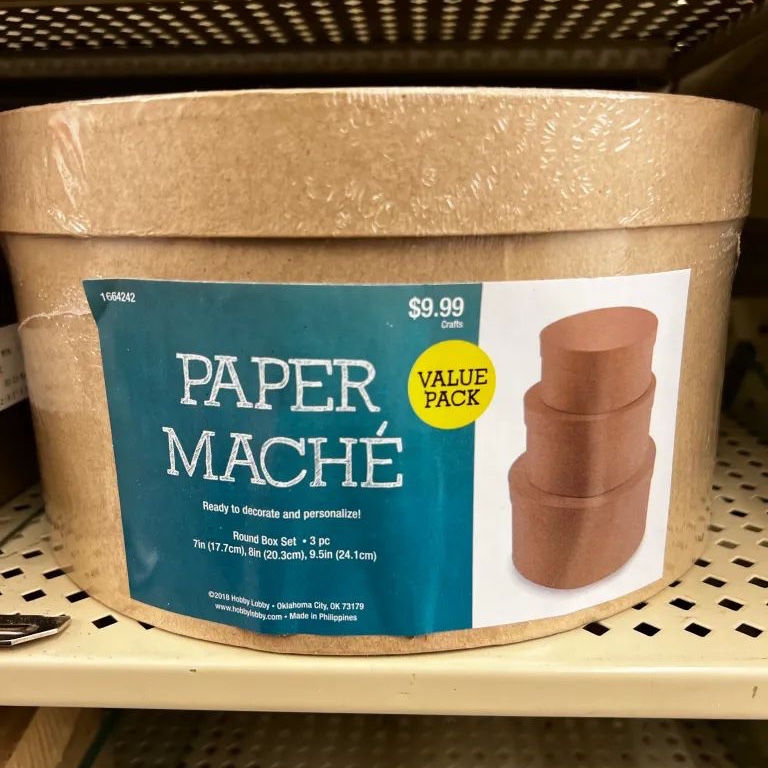
- Paper Mache Hat Boxes Small & Large
- Aluminum Foil
- Hot Glue Gun
- Paper Towels
- White Glue
- Masking Tape
- Slim Wooden Craft Sticks
- Thin Plywood Circles
- Basswood Trim
- Craft/ Utility Knife
- Cutting Mat
- Acrylic Paint (black, dark brown, medium brown, tan)
- Paint Brush
- Tacky Glue
- Poster board
- Scrapbook Paper in Desired Designs/ Colors
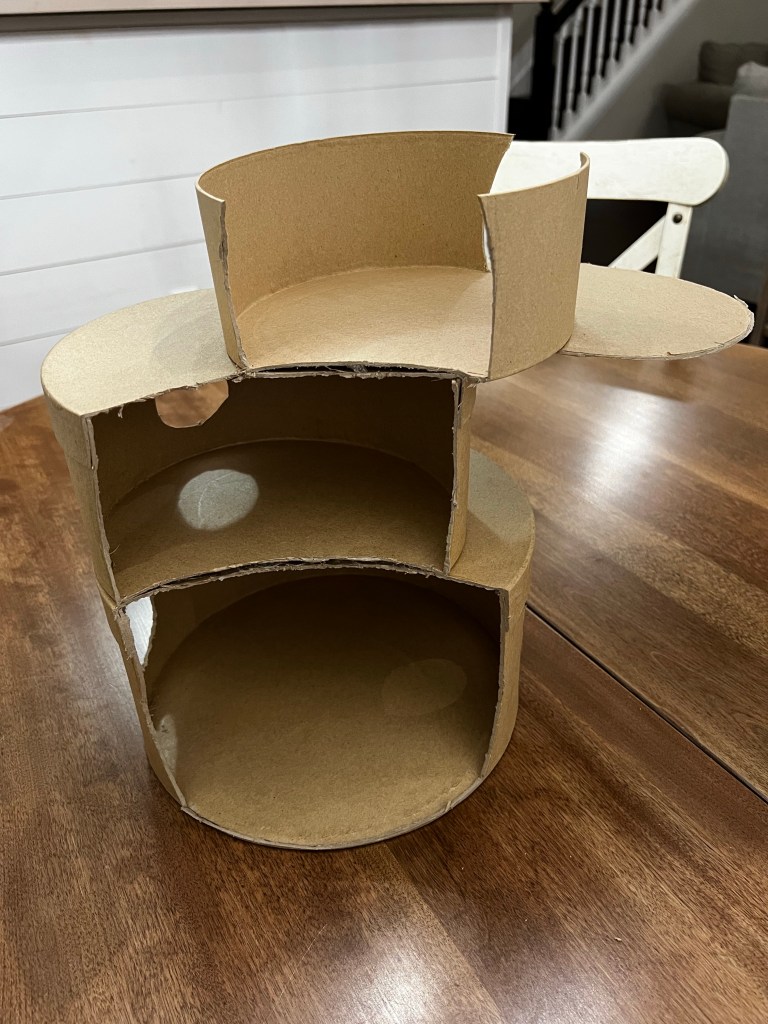
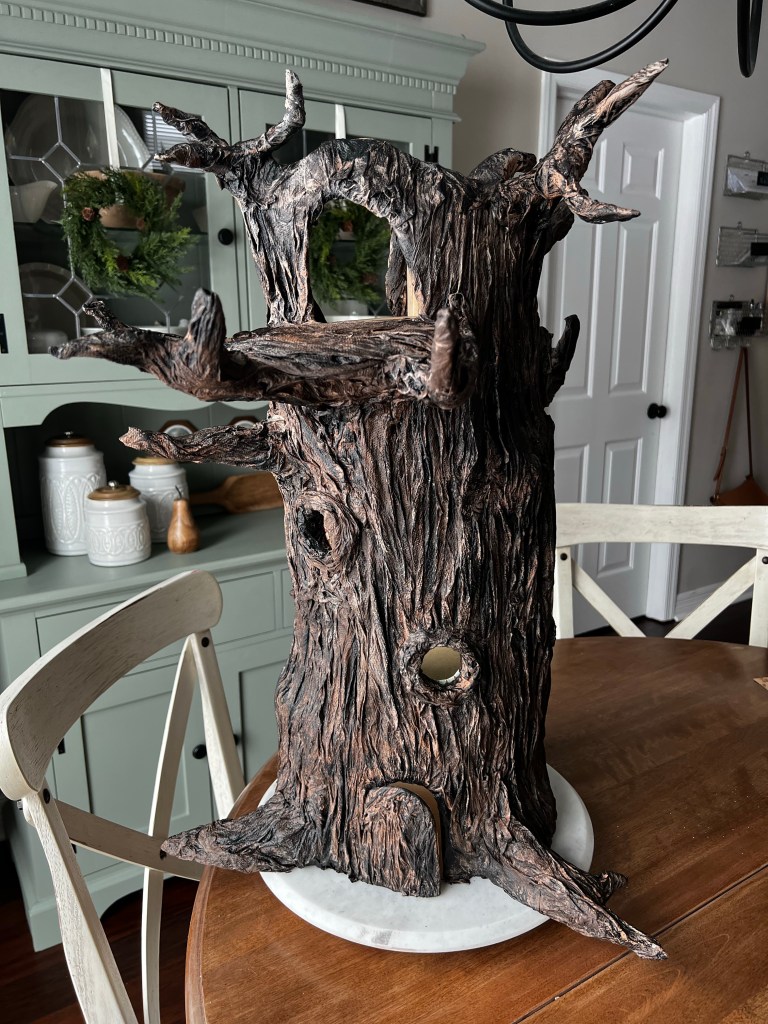
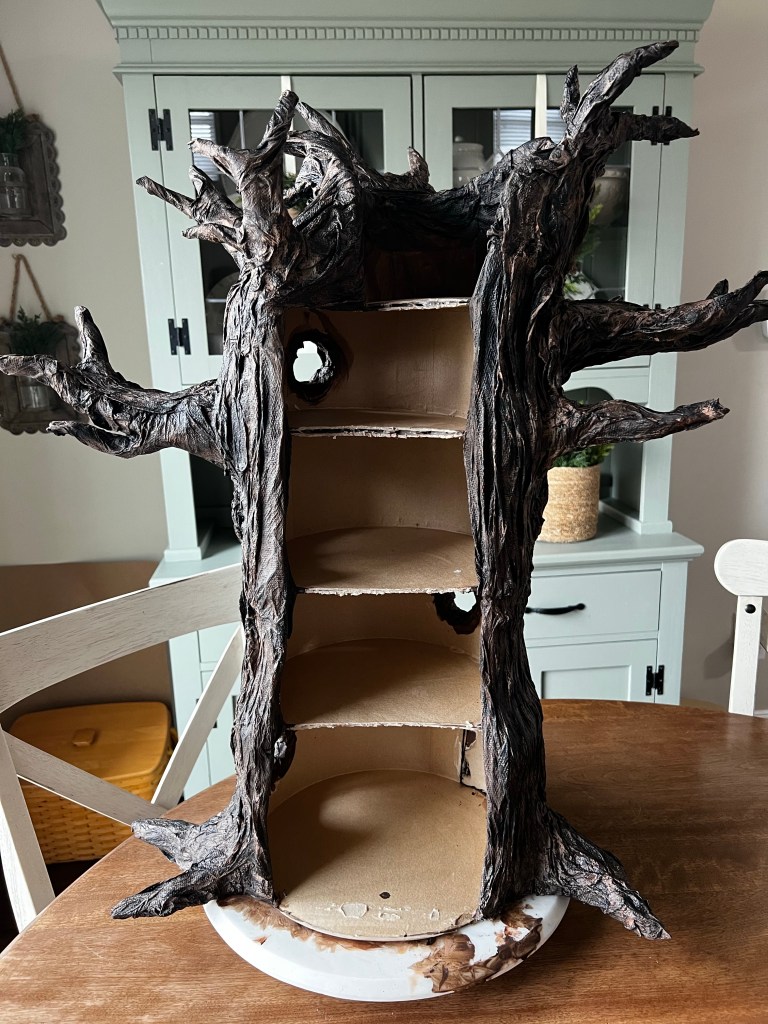
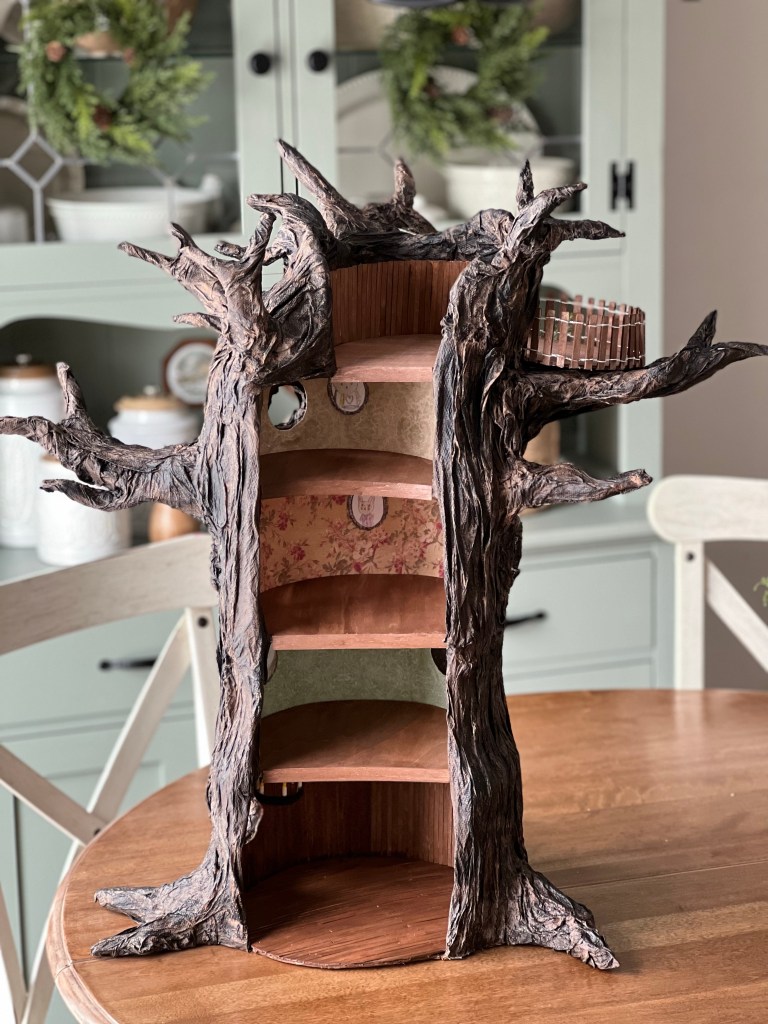
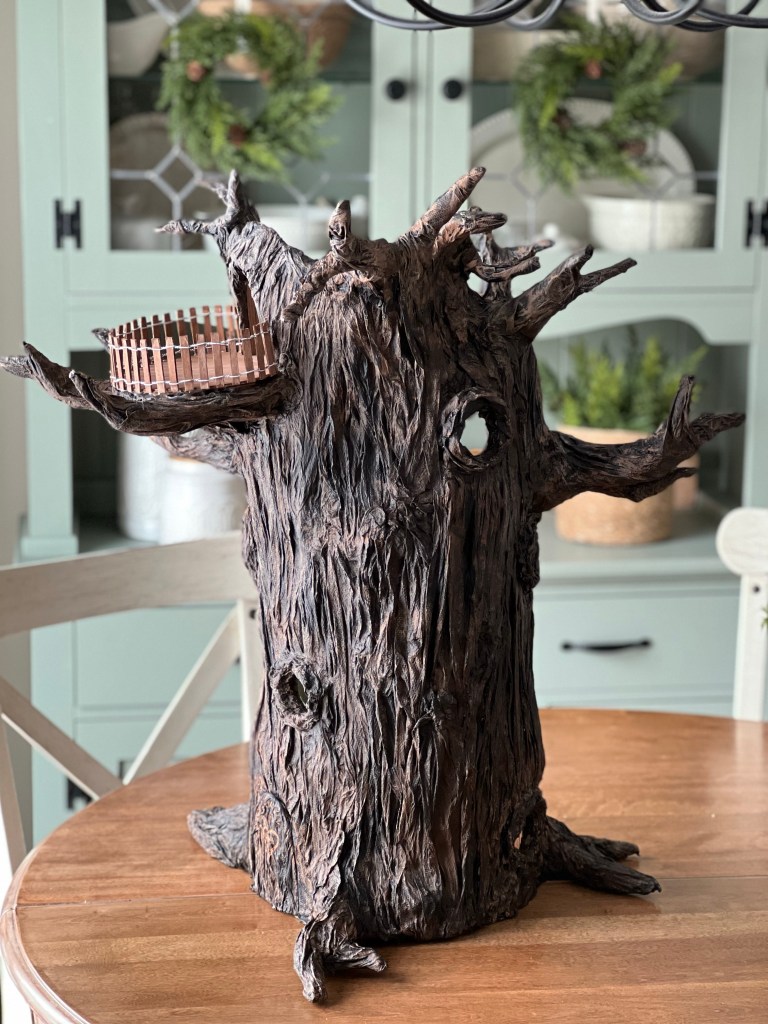
The Heartwood Hotel is located in a tree with rooms from the roots all the way up to the branches. I decided some type of paper mache would be the best in making a tree. I found some paper mache hat boxes at Hobby Lobby and knew they would be perfect for a tree base. The set came with 3 nesting boxes. Be on the lookout for sales on the paper mache! They are sometimes 40-50% off!
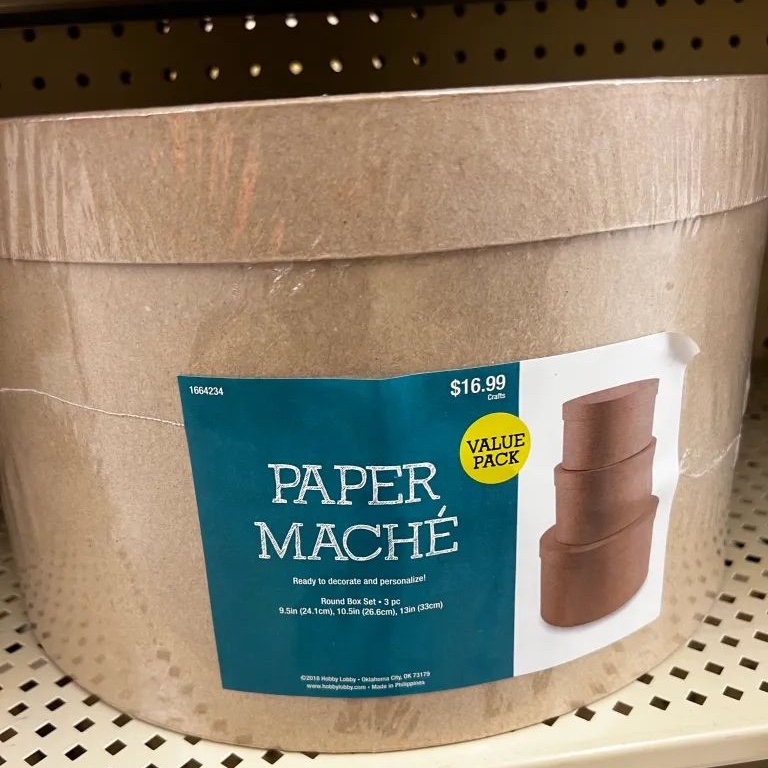
At first I thought the 3 boxes would be plenty tall enough, but once I started building out the tree bark I thought it was a little too short. It look more like a tree stump than a tree. So I got a bigger set of paper mache hat boxes and added them to the bottom of the already built base.
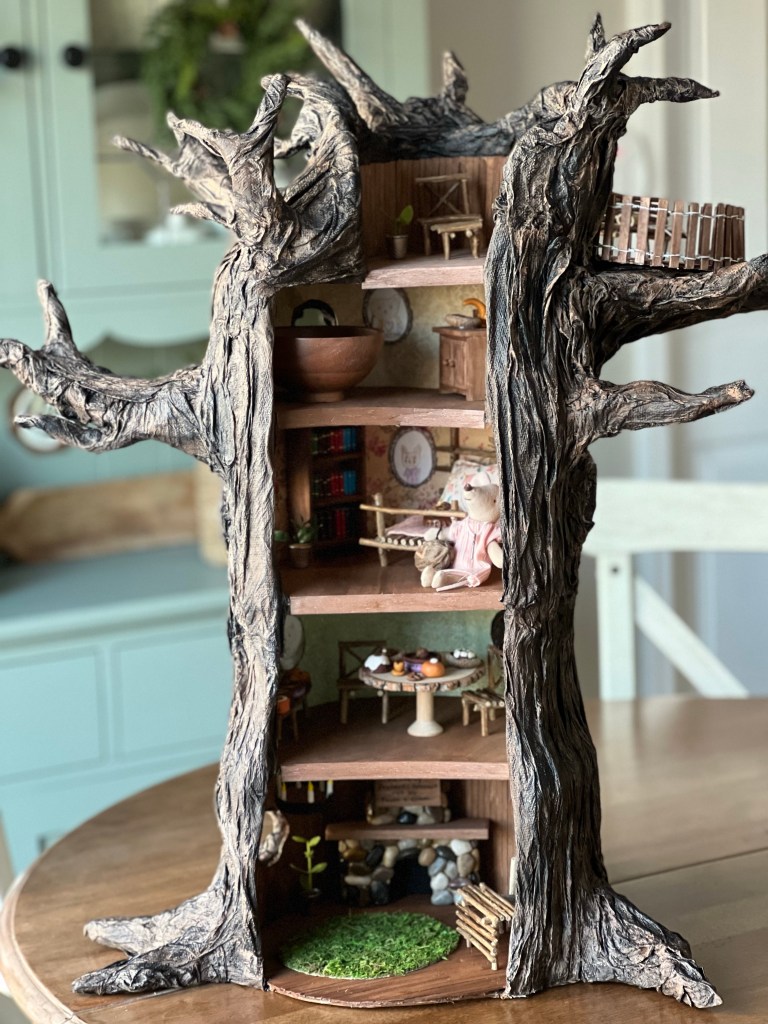
To make the rooms I put the lids on all of the boxes except for the top box. I wanted the top level to be open. I stacked the boxes biggest to smallest.
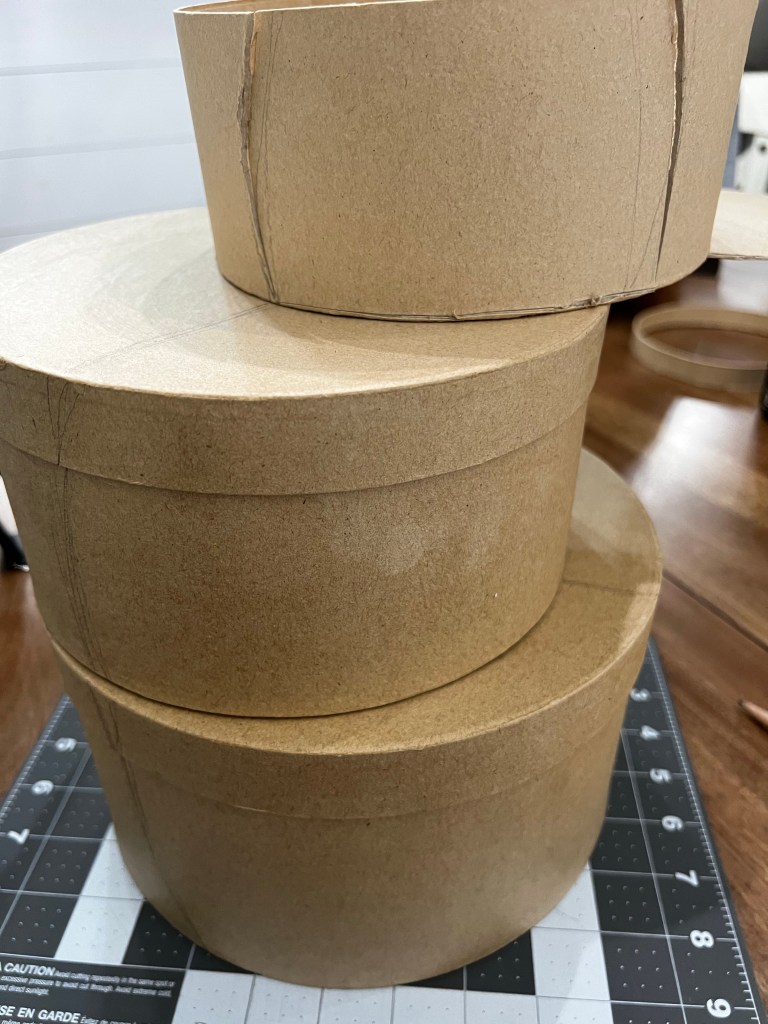
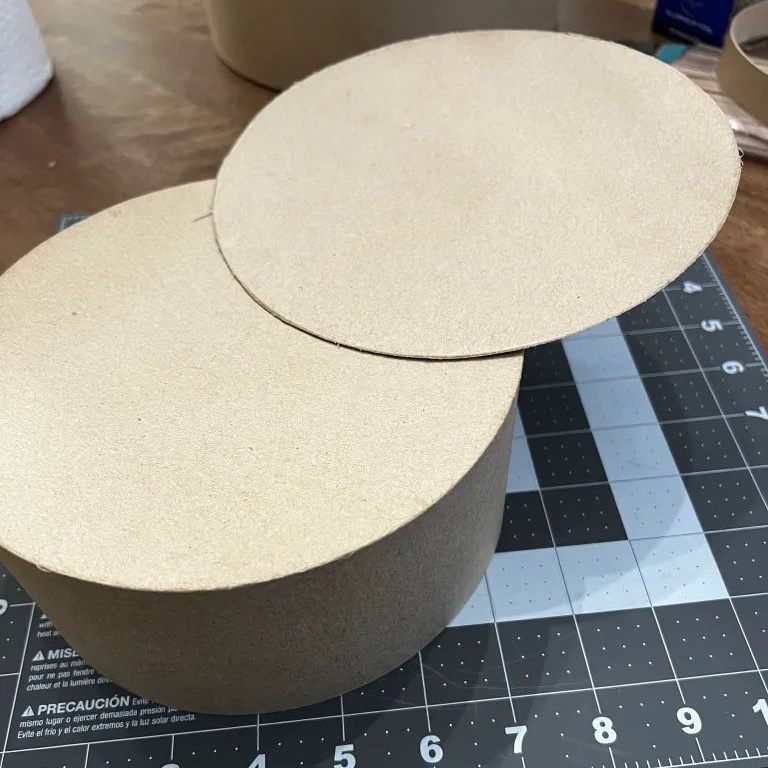
For the top room I wanted it to be open and have a little balcony. I used the lid of the top box for the balcony landing. I just cut the rim off of the lid and placed the flat circle underneath the top box.
Once I positioned the boxes how I wanted them I hot glued the boxes together. Then I drew with a pencil where I wanted to cut to open up the rooms. Then I used a craft/ utility knife to cut on the lines. This was difficult in the spots that had glue. If I were to do it again I wouldn’t glue the boxes together until after I cut them open. I also cut the door and windows.
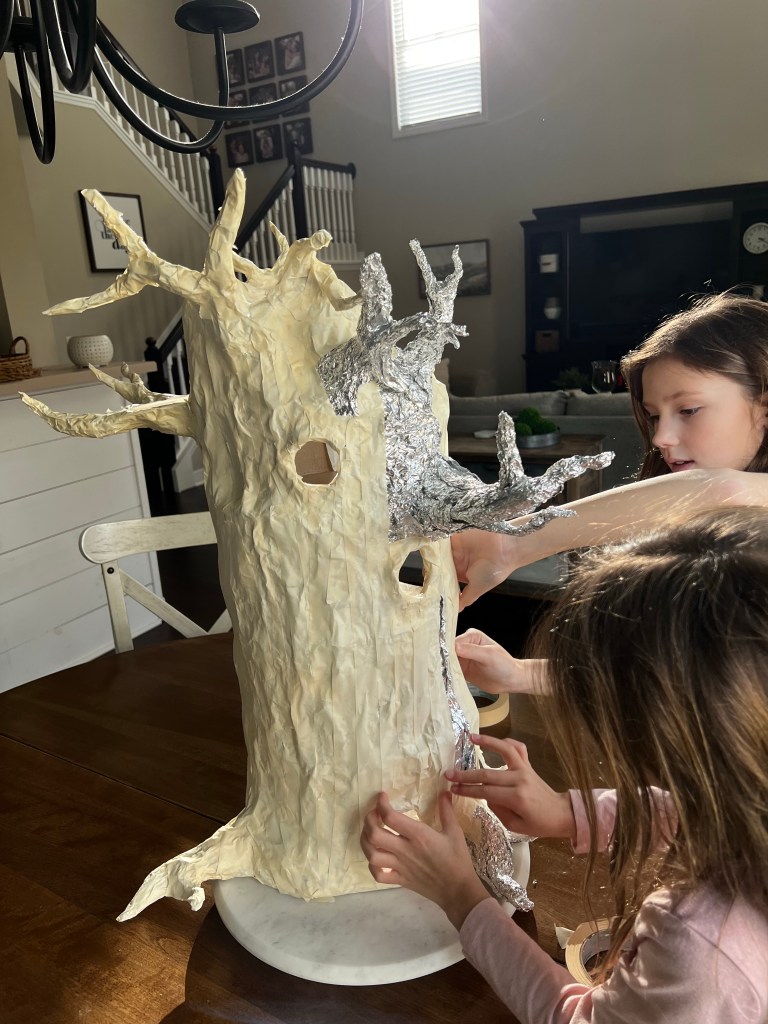
After cutting I began building out the sides of the tree. I wanted it to look like a tree and not just boxes stacked upon each other. So I used some scrunched up foil and hot glued it to the outsides of the boxes to create the sides, roots, and branches of the tree. This is when my girls started helping with the tree.
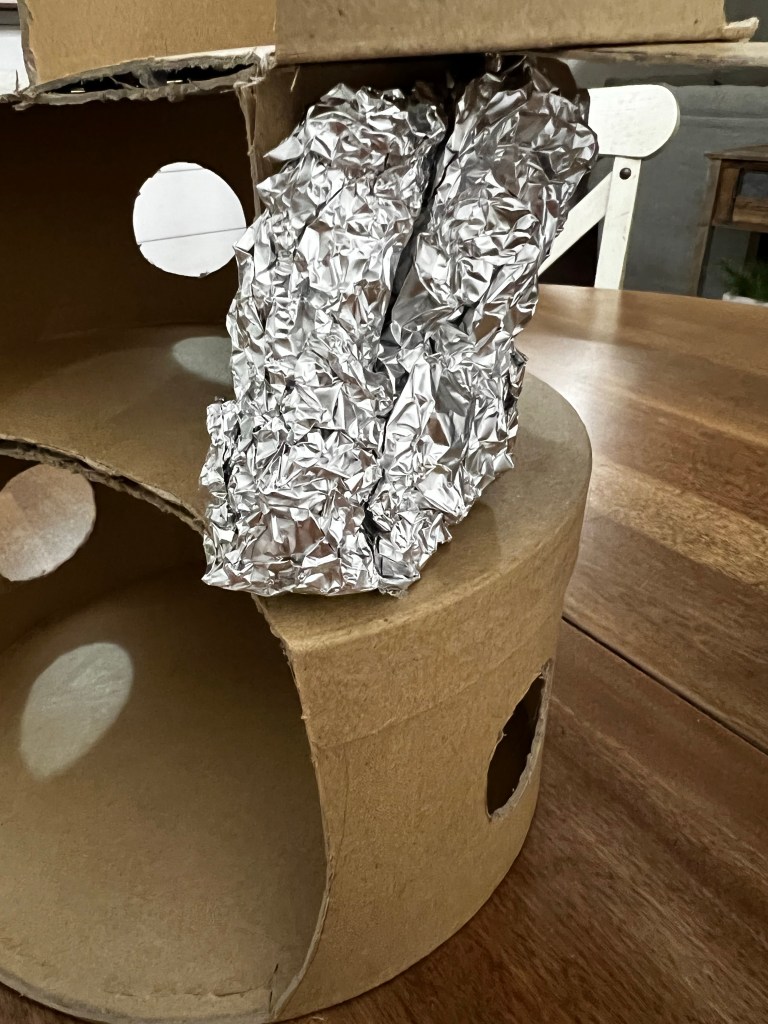
And this is the part where I realized it was going to be too short and I added two more layers. I also realized I wanted a little bit bigger rooms, hence the larger boxes.
After adding two more bottom layers I decided the door to the balcony needed a top. I used some of the extra paper mache pieces I had cut from the boxes and made a little archway.

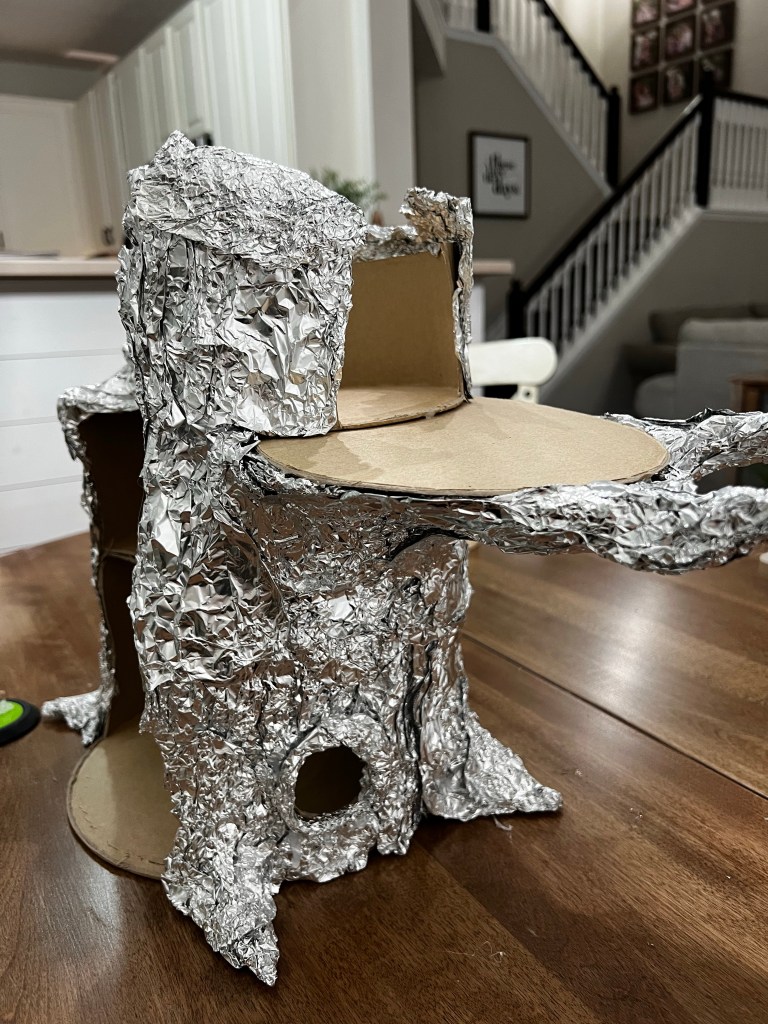
Then we decided to add more branches to the top. We just scrunched up foil to create branch shapes.
When we were satisfied with the shape of the outside we added masking tape all over the foil. This is to help the next layer stick.
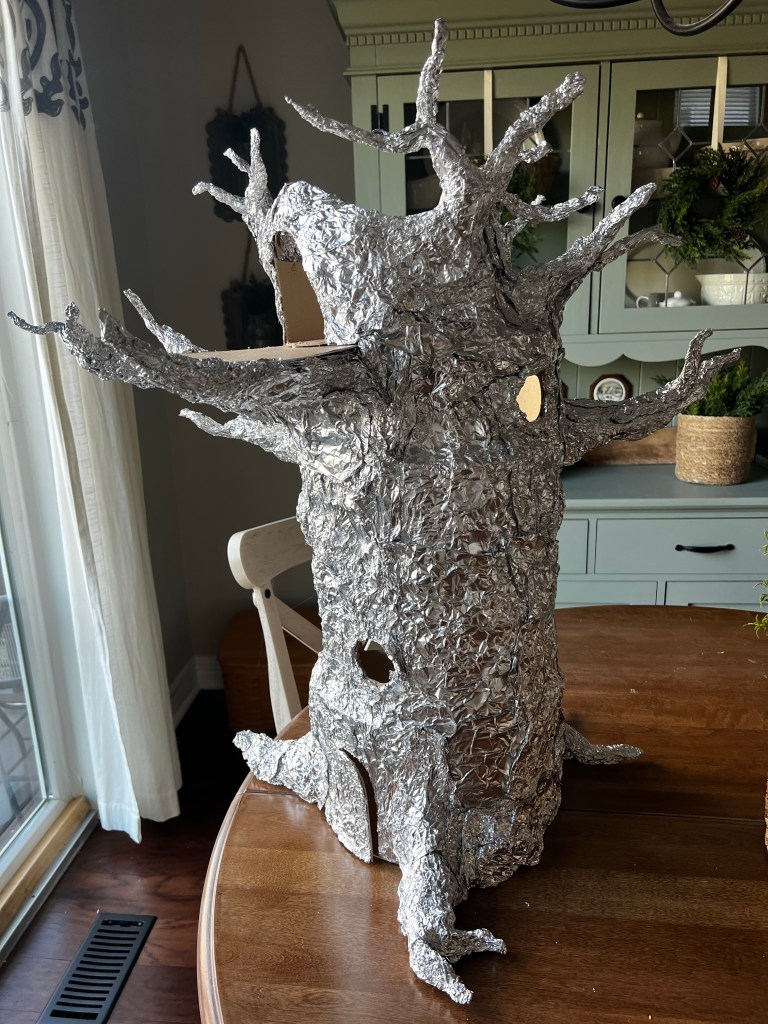
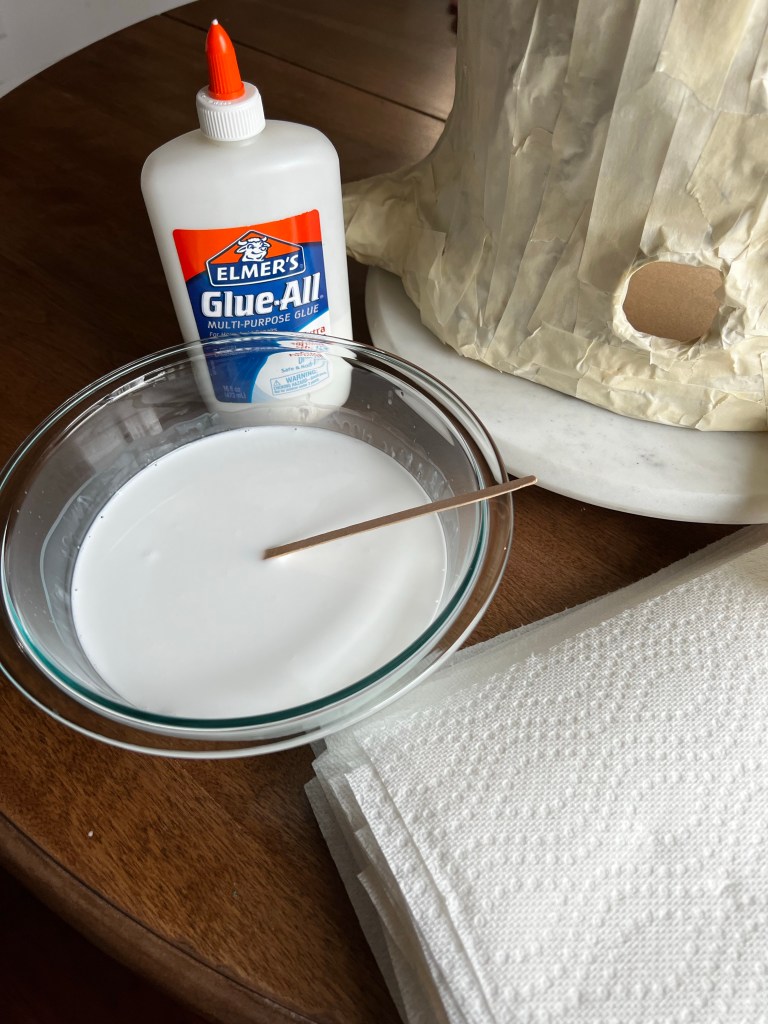
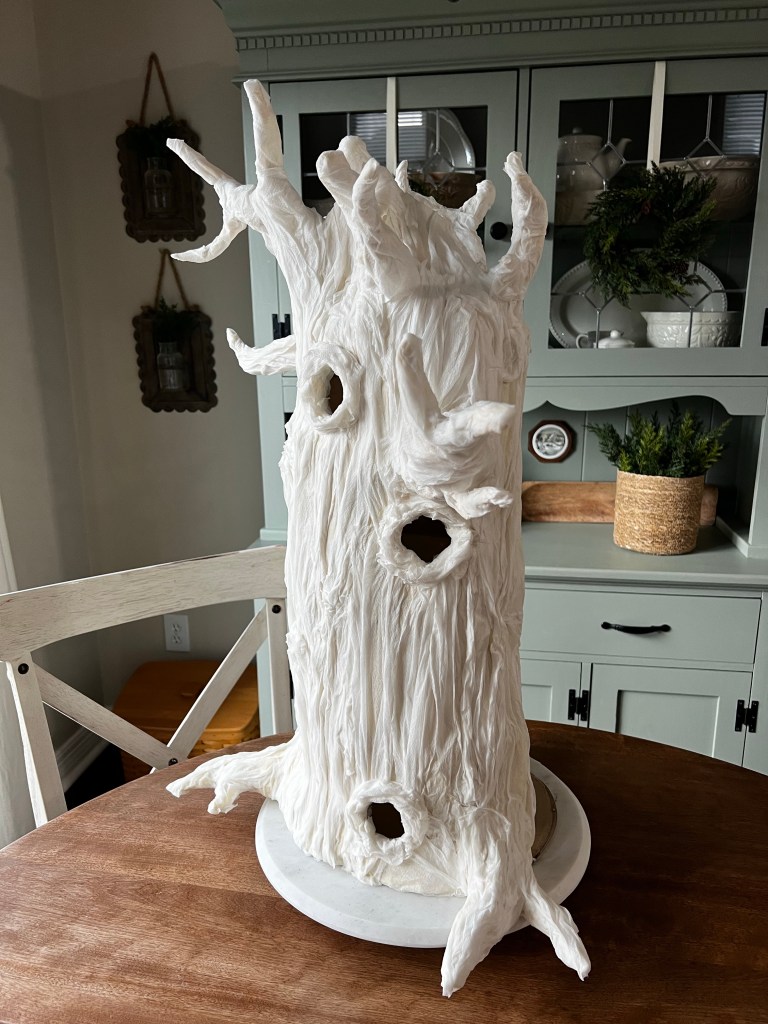
Now for the bark layer. This is the most fun and messy part, but it really makes it look so realistic! I found several tutorials on Pinterest after searching for “how to make realistic bark”. I ended up choosing the paper towel/ glue method. Mix half glue, half water in a bowl.
Dip a paper towel into the mixture, then squeeze out the excess. As you place it onto the tree base, scrunch the paper towel to create folds and texture like real bark. I set the tree on a lazy Susan to make it easy to turn when needed. It was also nice to have it lifted off the table so I could get under the root pieces. I would suggest laying down some wax paper on your workspace under the tree because it gets SO messy!
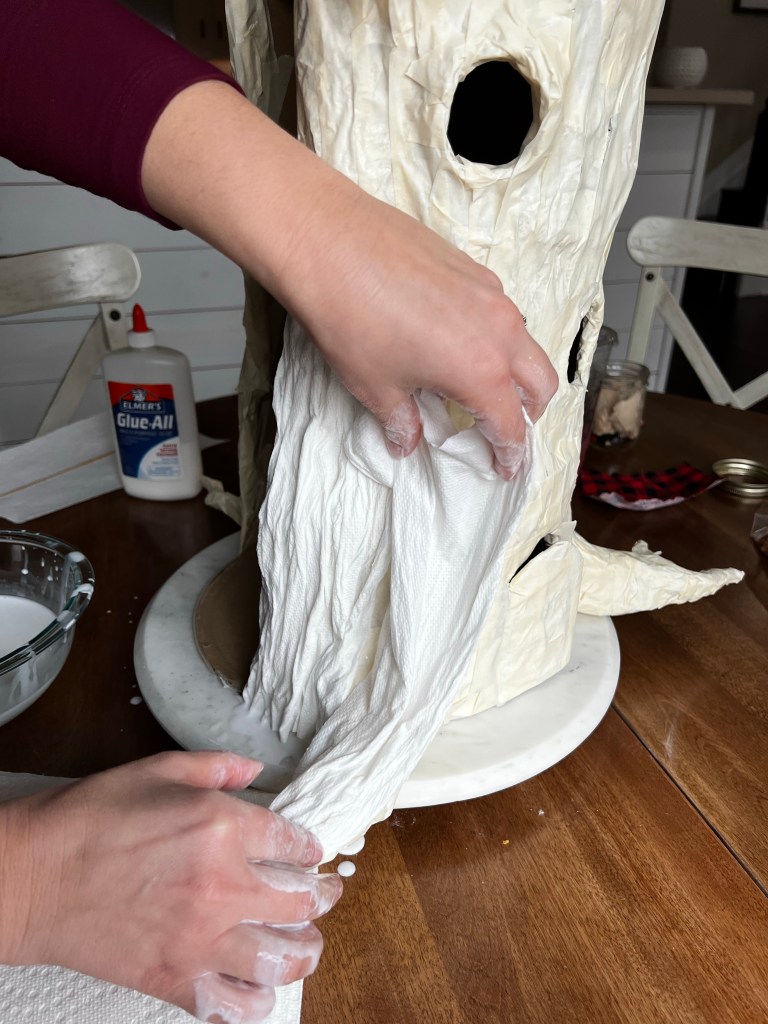
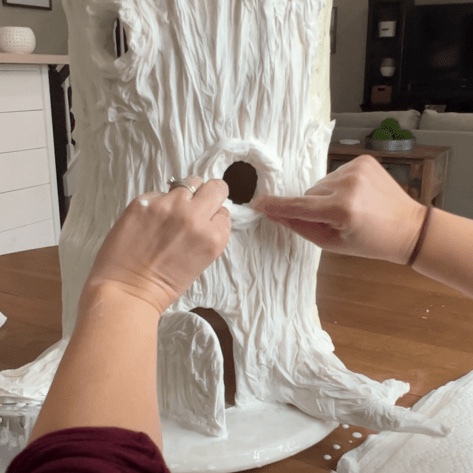
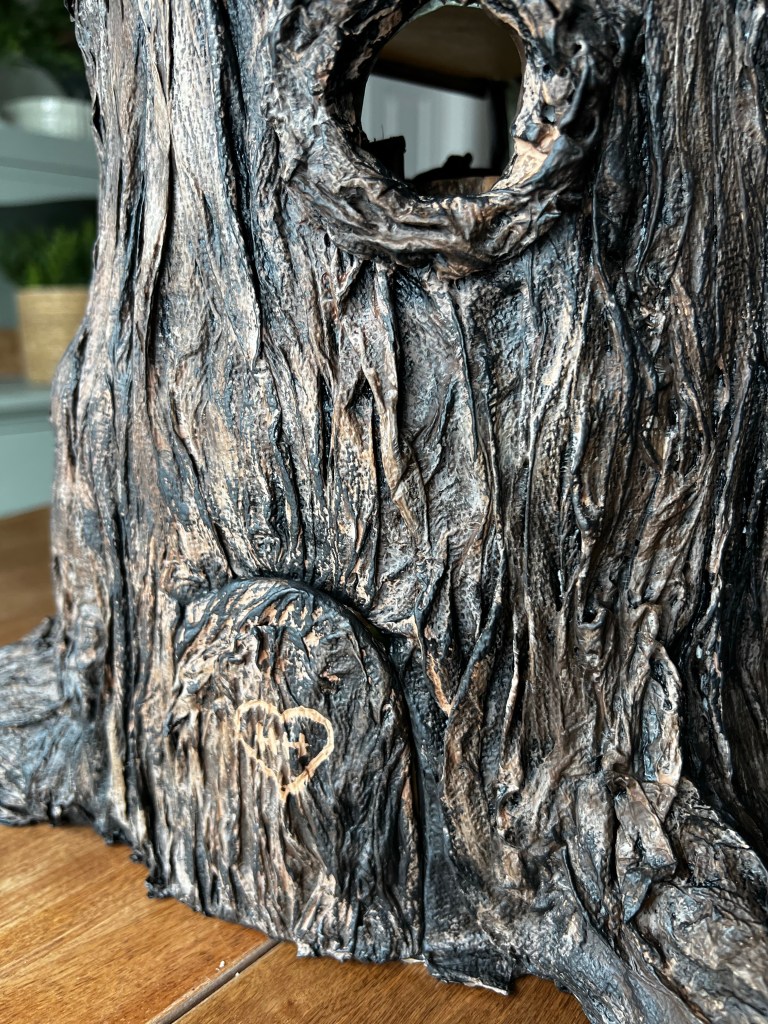
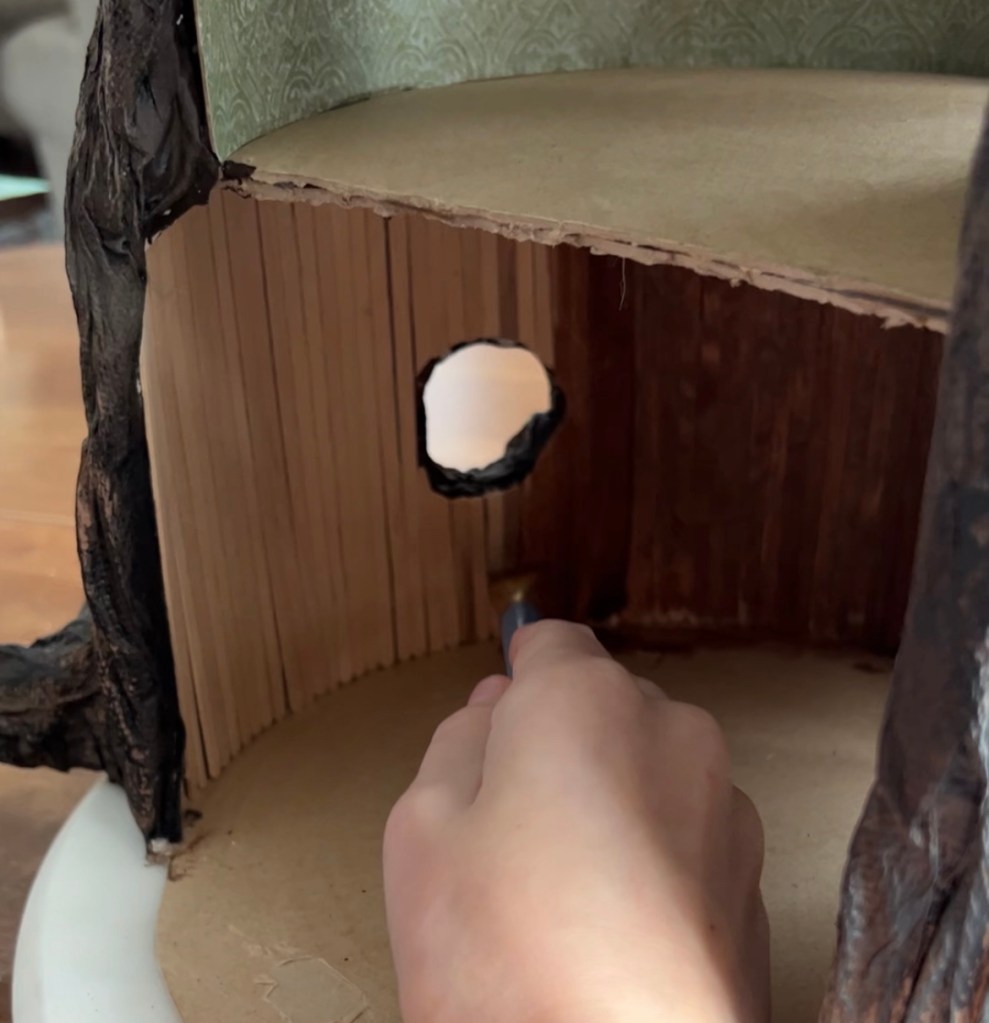
You can even create knot holes as you add the paper towels. I chose to make the windows knot holes. I just added more paper towels around the window and scrunched them up to create the texture.
I built it up the balcony section a bit using the paper towels. It was sagging a little and I wanted to make it as level as possible knowing that I was going to add a wooden floor.
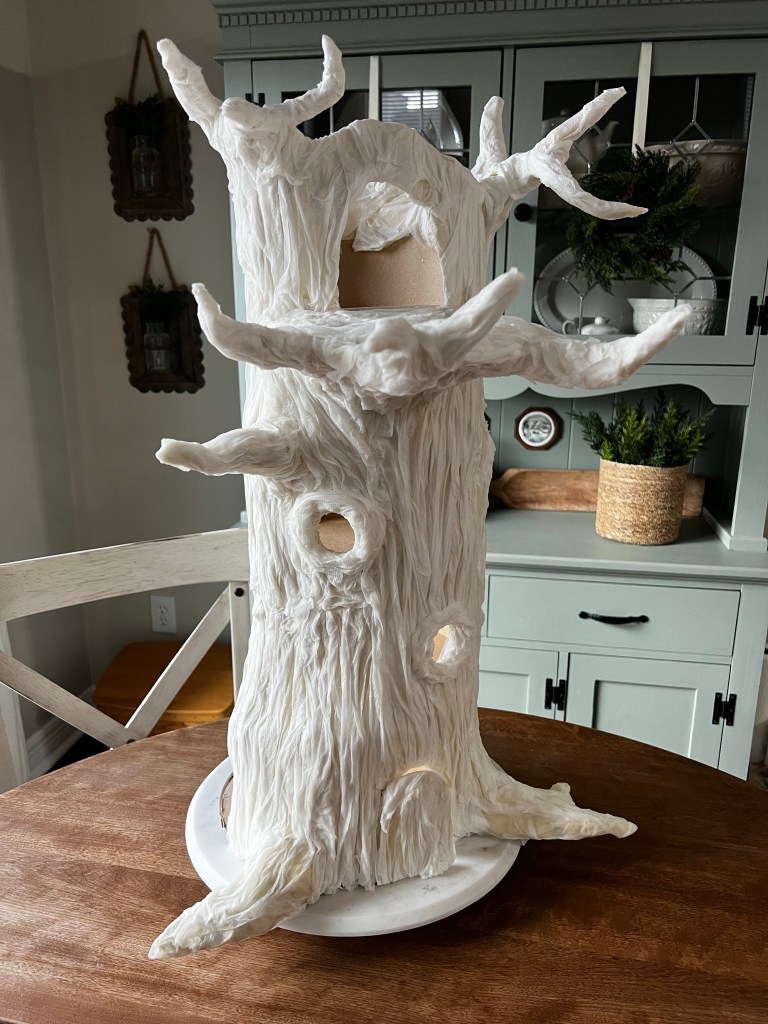
Continue adding paper towels all around the tree, adding more to build out any knot holes. After covering the tree with paper towels let dry overnight. I turned on a box fan on it and it was completely dry by the morning.
After the tree is completely dry it’s time to paint. This is where you really start to see it become a tree. Definitely put some wax paper under the tree for this part. Mix black paint with a little bit of water. This just helped the paint go a long way. Make sure you cover every nook and cranny on the tree. After drying you will probably notice some white spots showing through, just cover them up with more black paint.

Once the tree is dried and completely covered in black paint you can start layering with shades of brown. I started with a dark brown. I mixed some water with a dark brown paint and used a dry brush to paint it on. I always like to wipe the excess paint off the brush before painting. Don’t go into the nooks and crannies with the brown paint. You still want to see the black paint in those spots because it will look more realistic.
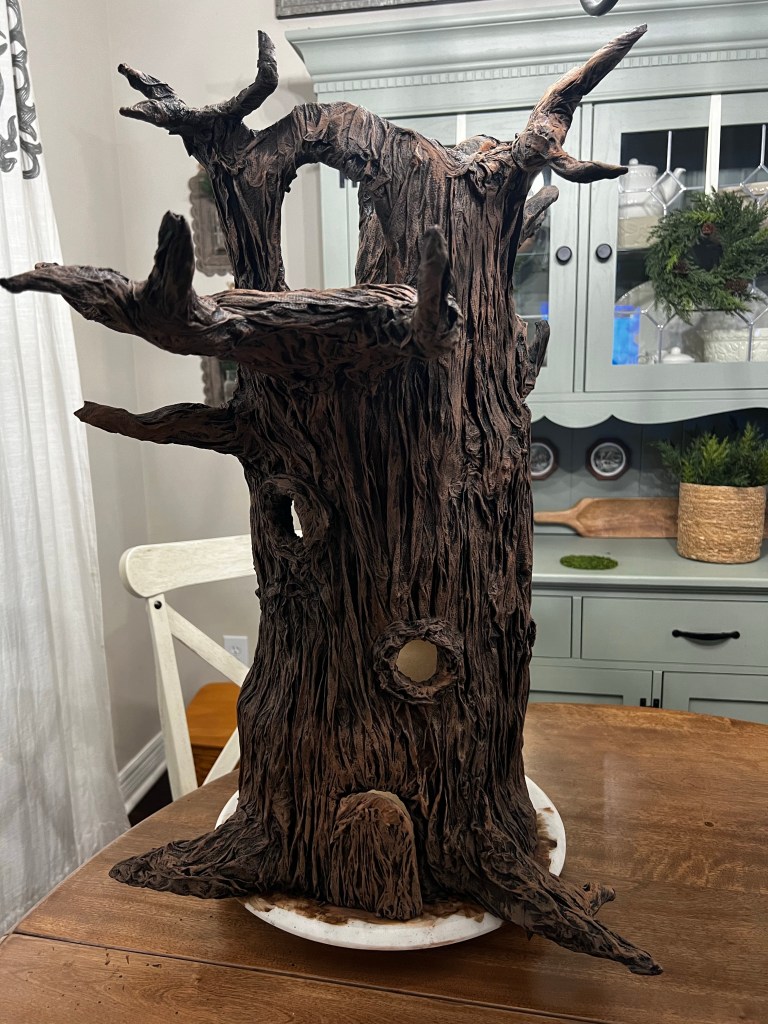
Once the dark brown paint is dry you can add more layers of light brown and tan colors. Remember to add a little water to the paint. Wipe off any excess paint from a dry brush when painting on the layers.
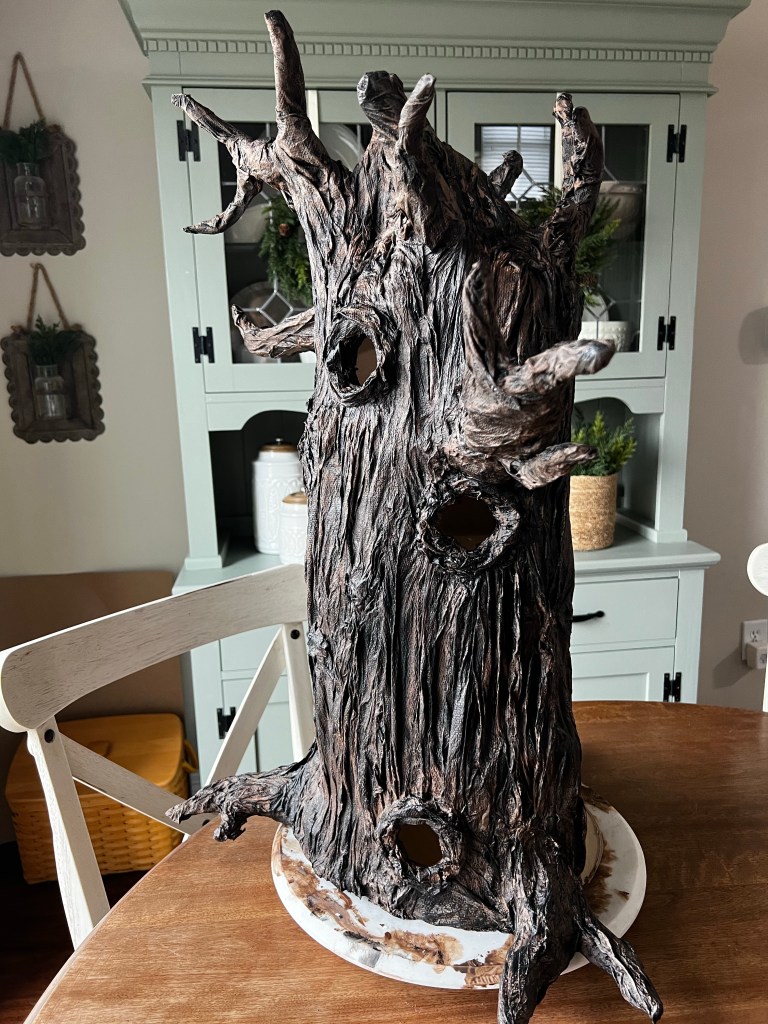
You may have to play around with the colors and layers a bit. I went back through a few times with black, brown, and tan in various spots.
The finishing touch on the outside of course had to be the little heart on the door. We just used tan paint to make the little heart and the letters HH.
The Inside
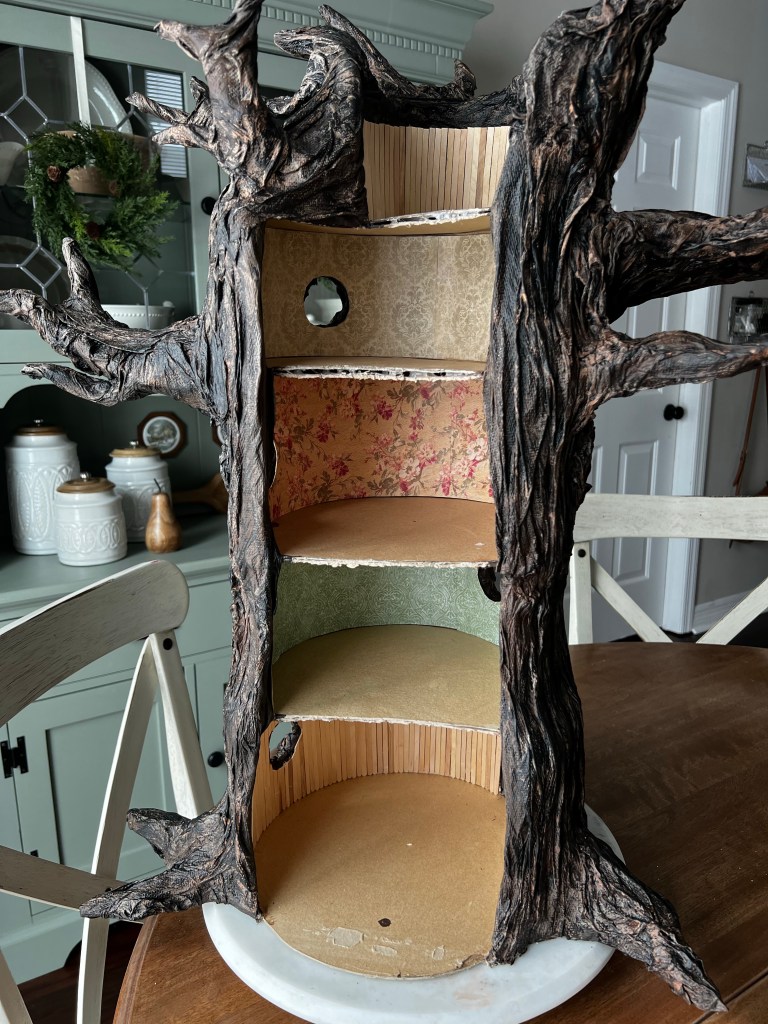
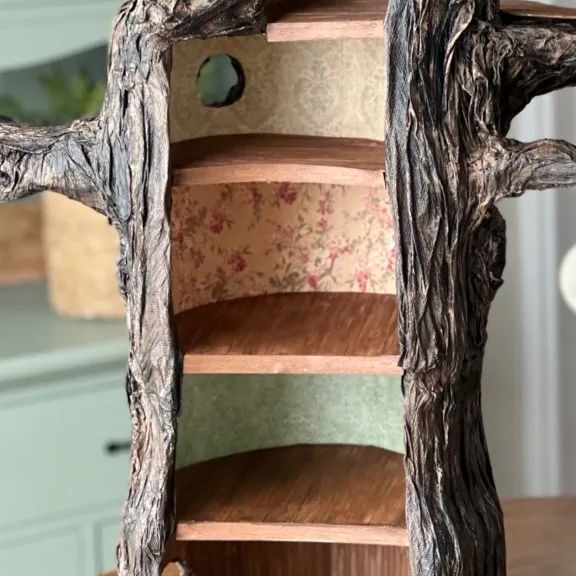
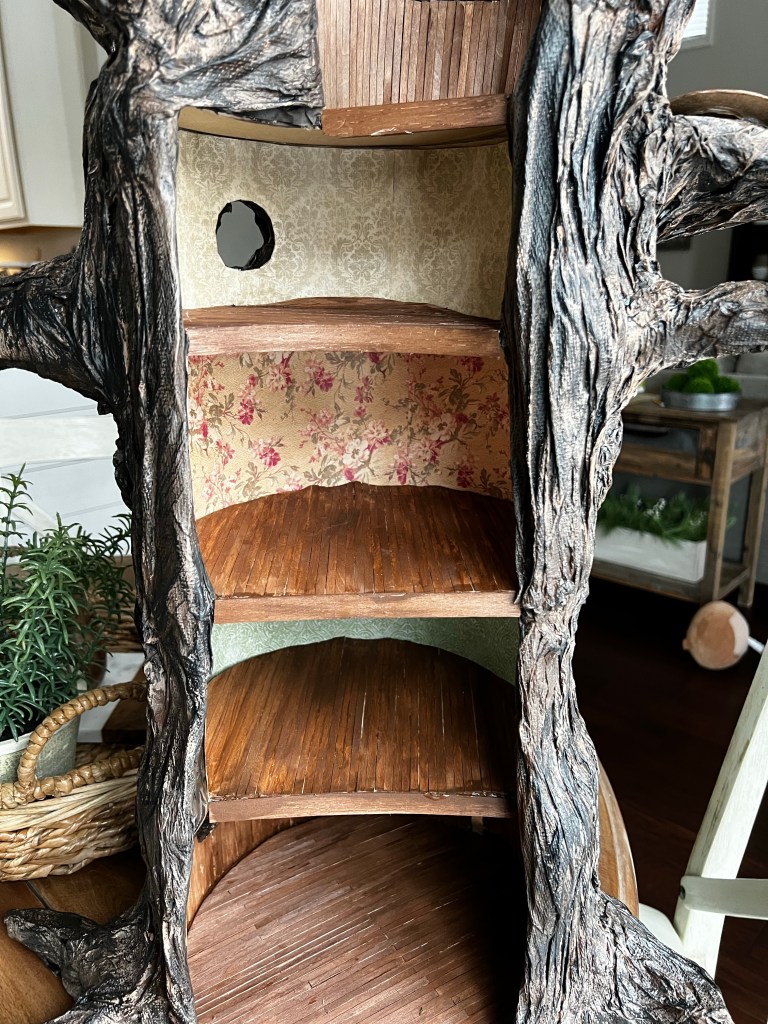
Now comes the fun part, decorating the inside!There are multiple ways to cover the walls and floors. I recommend doing the walls first. You can paint the walls or cover them in wood pieces or scrapbook paper.
Originally I wanted to have wooden walls in every room. I quickly realized it was going to be way too time consuming. So I ended up only doing the top and bottom rooms. For the other rooms we used scrapbook paper as wallpaper.
Wooden Plank Walls
For the wooden walls I used these wooden craft sticks. I started with measuring the height I would need for around the room and cut the craft sticks to size. I used hot glue to attach them to the wall one by one. The hardest part was cutting around the window.
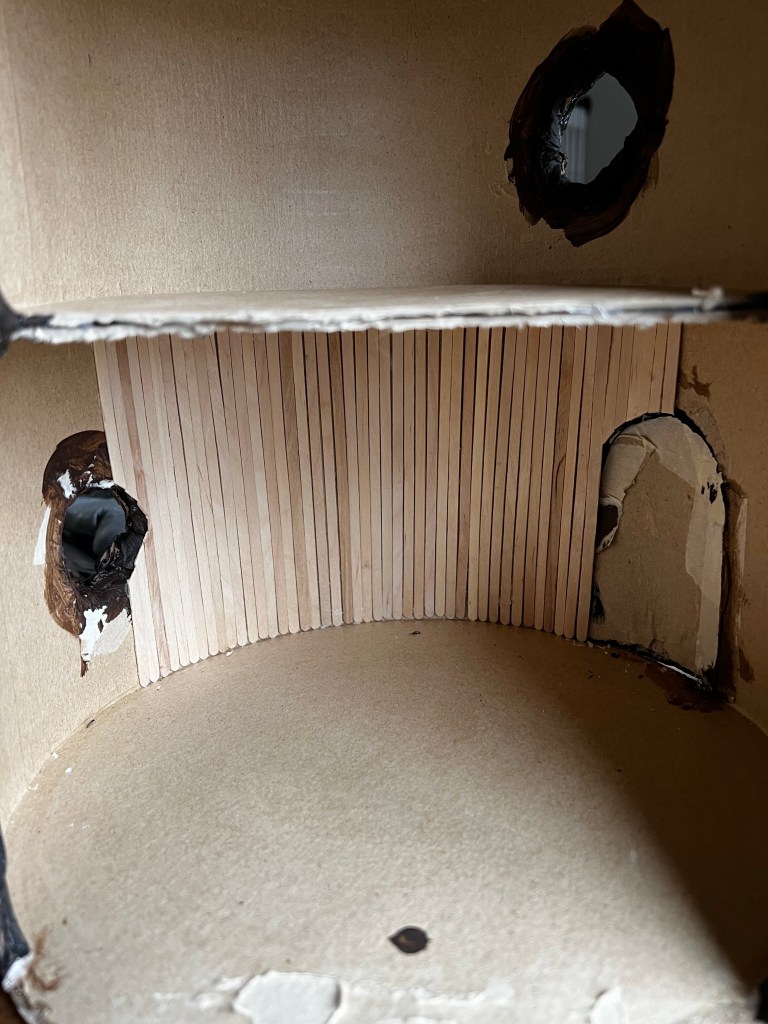
Honestly this bottom room took about 3 hours total to do.
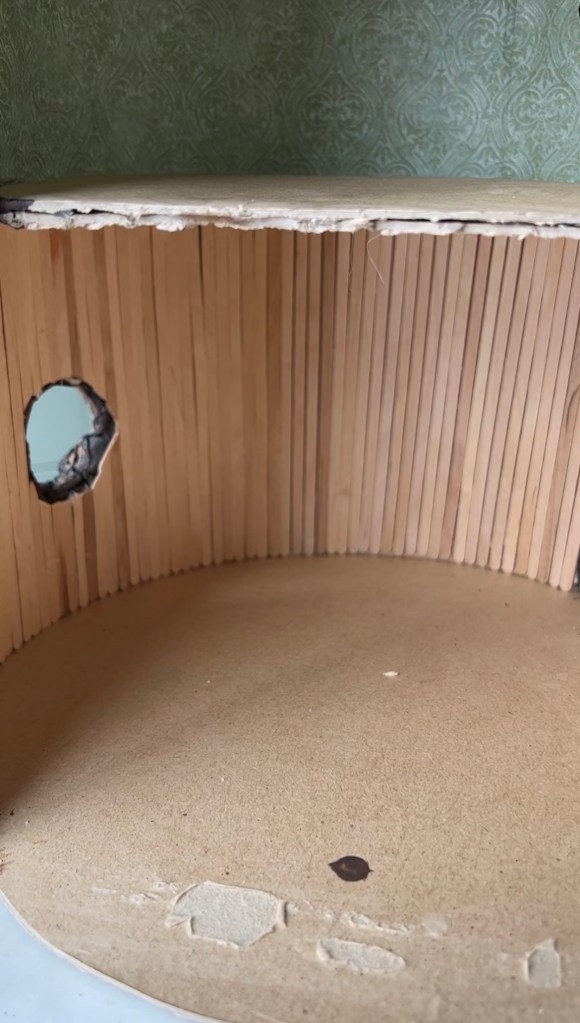
The top room was much easier to do since there were no windows or doors and was much smaller.

We used a dark brown paint mixed with water to use as a “stain” on the wood. Wipe any excess paint off of the brush before painting onto the paint. This helps it to look more like a stain and not thick like paint.
Scrapbook Paper Walls
The scrapbook paper wallpaper is much easier to do. I recommend measuring the wall length and height using a soft tape measure. Then cut a piece of poster board to the exact fit. If you have any windows place the poster board on the walls in the room. Then trace the window from the outside of the tree to get a general idea of where to cut the circle. Take the poster board out and draw a little bit larger circle and cut out using a craft knife. Place the poster board back onto the wall to make sure everything fits and the windows are visible. Once you have everything cut to fit, lay out your scrapbook paper onto the poster board and cut to fit. Brush mod podge onto the poster board and place the paper onto it. To cut the windows, flip the poster board over and cut an X into the window. Then fold the pieces over onto the back and glue down with mod podge. I realize now as I’m writing this post, I didn’t take any pictures of this process. I’m so sorry!
Wooden Floors
Now for the floors. I had the coolest vision in my head of tiny wooden plank floors throughout the tree. What I didn’t realize is how difficult it was going to be to achieve that look. For my first try I cut a piece of poster board to fit the bottom room floor. Then brushed a thin layer of tacky glue all over. I added the wooded craft sticks, staggering them as needed for the bottom floor since it is the largest room. I didn’t worry about cutting each craft stick to fit because I was just going to cut all around the circle with scissors since the sticks are thin enough. I placed wax paper on top and set some heavy books on it to dry overnight. The night morning it looked great! So I decided to make all the rest of the floors.
What Went Wrong & How I Fixed It
Here’s where I ran into problems. I rushed through making the others. I realized I didn’t need to stagger any of the craft sticks because the rooms were smaller and they could fit. So I powered through quickly cutting out all of the poster boards. Then I plopped the glue onto the posters and didn’t take too much care in managing the amount of glue I put on. It was WAY too much glue. Every time I would lay a craft stick down, glue would seep through the cracks. I just thought I would wipe the excess off later and all would be good. Wrong! Not only could I not wipe it off easily, I also couldn’t even sand off the excess. I still stuck with the process and made them all. I placed them on top of each other with wax paper in between and added heavy books to the top to dry overnight. It seemed to work even thought I had a lot of excess glue everywhere. I got it fairly smooth with a sander. Then my girls did the paint “stain” technique on all the floors. I let them air dry for a bit but then placed them on top of each other with wax paper in between and heavy books on the top to make sure they didn’t curl up or anything while drying. I didn’t let them dry overnight this time. I only waited a few hours. But they were all completely dry so I started hot gluing them in each room.
To cover the front sides of the wood floor and the paper mache boxes underneath I used the thin bass wood strips painted to match. I cut them to fit each level and hot glued them in place.
Everything looked great! I was so pleased and very excited to start making the furniture and decorating the little tree. I took some pictures and videos and shared a short reel on my Instagram about the progress. Unfortunately the next morning I woke up to find all but the bottom room floors had curled up and bowed. I then realized it was because I used entirely too much glue.
I decided to head back to Hobby Lobby to get some more craft sticks and just start over. This time being more careful and using a lot less glue. But when I got there they were completely out of stock of the craft sticks! I looked online at other local craft stores but couldn’t find anything similar to the ones I had used. So I looked up and down the aisles of Hobby Lobby to find an alternative. I found some 10 inch wooden plywood circles. I thought I could remove the curled up floors and glue them onto the wood circles. Maybe the wood would keep them all down flat.
Once I got home I removed the old floors and realized there was no way I could reuse them. They were dried hard and stuck in those positions. I decided to try out the wood circle by themselves. Just to see what it looked like. Thankfully these were so thin I was able to use scissors to cut the circles to fit the rooms. I laid the first piece in and loved it! I decided to go ahead and do all the rest of them the same. I ended up keeping the bottom room floor because it never curled up anywhere and still looked great.

After cutting to fit each circle my daughters paint “stained” them all and we hot glued them into each room. I added the same kind of thin bass wood trim as I did on the other floors. I was SO nervous waking up the next morning to check the tree. Thankfully the floors were still perfectly flat and level!
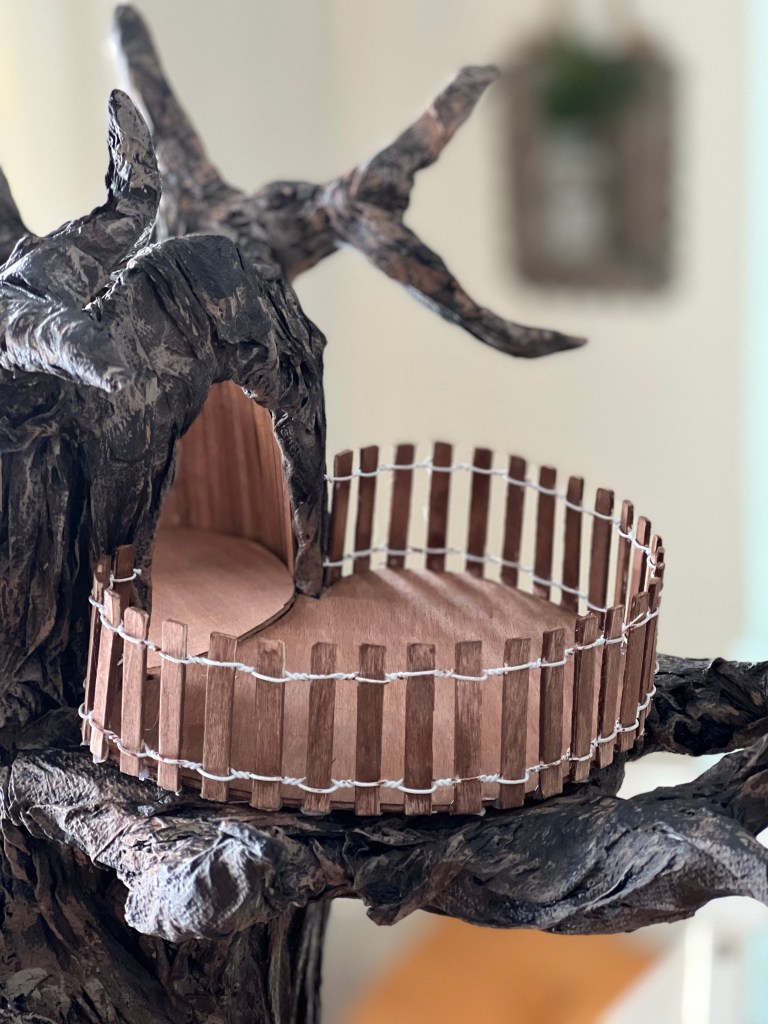
Balcony
For the balcony I wanted to create some sort of railing to go around the perimeter. My original plan was to use long thin pieces of balsa wood. It’s very flexible. I thought maybe I could bend it around the perimeter of the balcony floor, then add small cut craft sticks for the spindles and posts. I was wrong. Every time I tried to bend it that much it would snap in two. Back to the craft store we went. This time to Joann Fabrics. I found this little wooden fencing piece. The fence posts were connected with wire so it’s super easy to bend any which way you need. I decided this was going to be the best option. I cut the tips off of the fence because I didn’t want it to look like a fence. Then my girls paint “stained” them to match the rest of the wood. I hot glued it to the outside of the balcony floor. I was so excited it worked!
Decorating the Inside
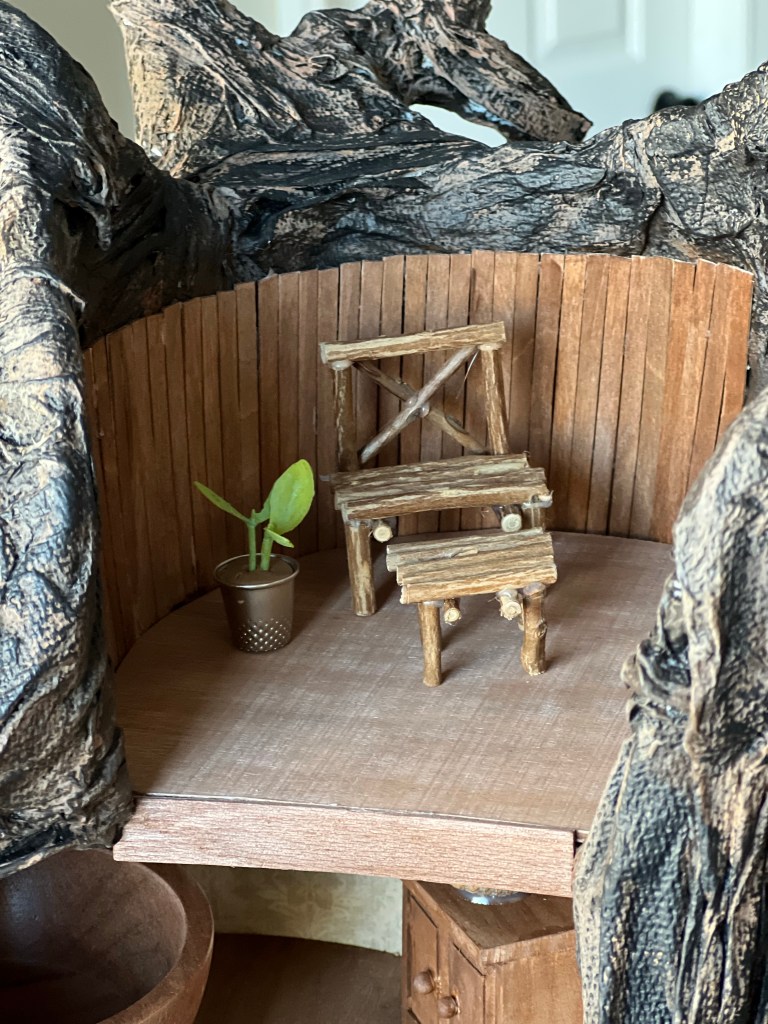
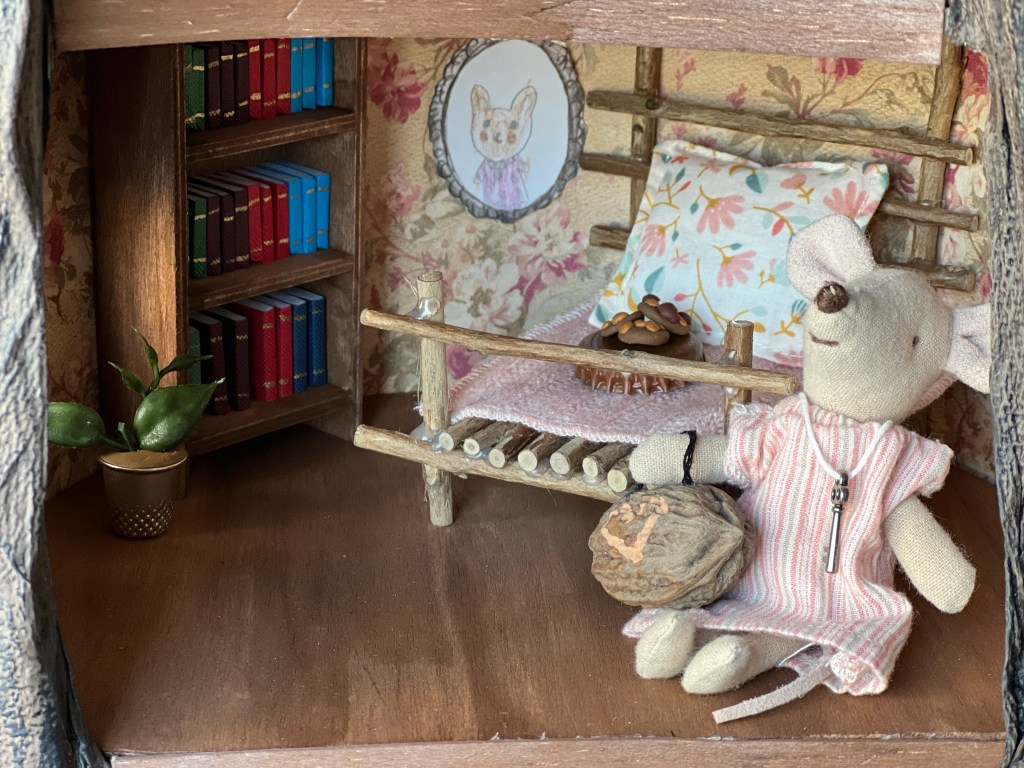
Then came the fun part, decorating the inside! We decided to make some furniture using small twigs. A bed, chairs, the front desk, and a little bench. I used a craft knife to cut the twigs to the sizes I needed to make each piece. To assemble them I used hot glue.
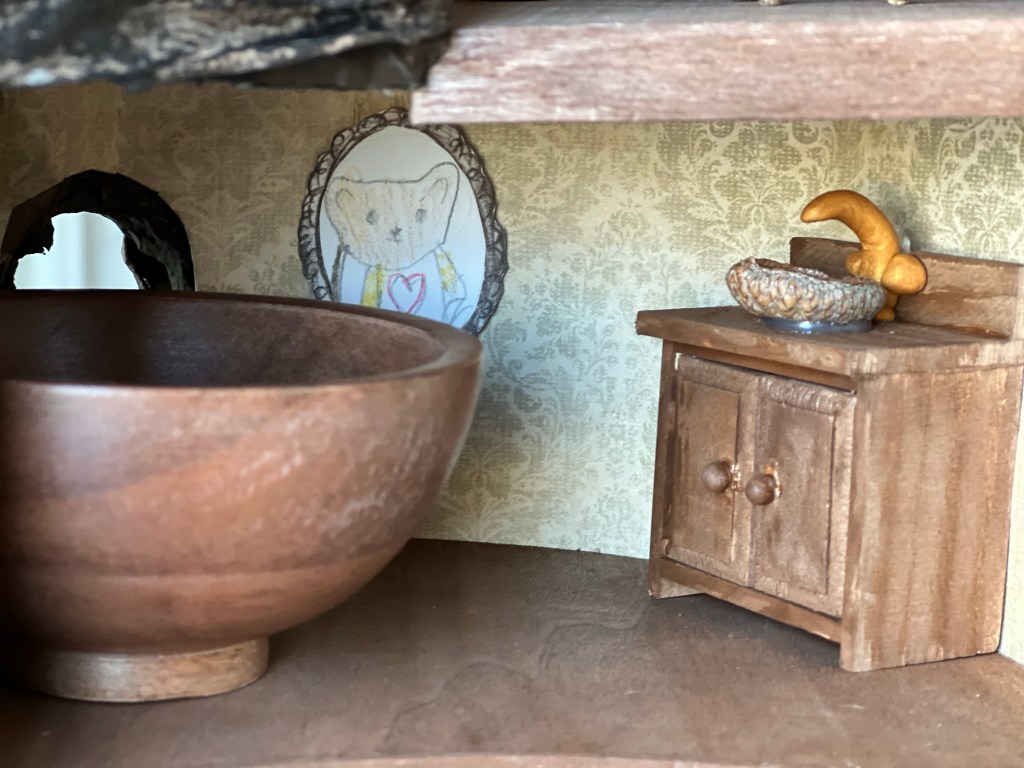
We did purchase a few furniture pieces from Michael’s and Hobby Lobby in the dollhouse section. A wooden bookcase, some small books, and a little wooden cabinet to use as a sink. My girls decided to paint stain the wooden pieces to match everything.
For the sink my daughter made a little faucet out of clay and hot glued it to the top of the cabinet with an acorn top as the sink basin. We used a small wooden bowl for the bathtub.
For the dining table we hot glued together a wooden spool and wood slice. We also made a little buffet table using a piece of bark and some twigs. My girls had so much fun making the little food and accessories for the hotel. Acorn soufflé, seed cakes, honeycomb cups, and cookies made of polymer clay.
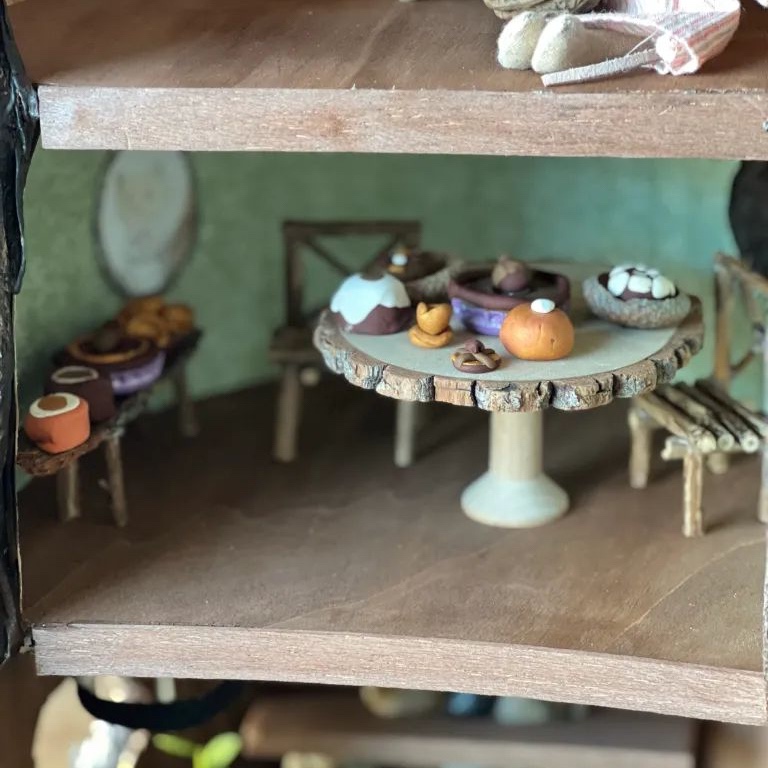
They also made some cute little plants using thimbles as the pots and a chandelier using a toilet paper tube and some polymer clay candles. They drew and colored tiny portraits to hang on the walls of the rooms as well.
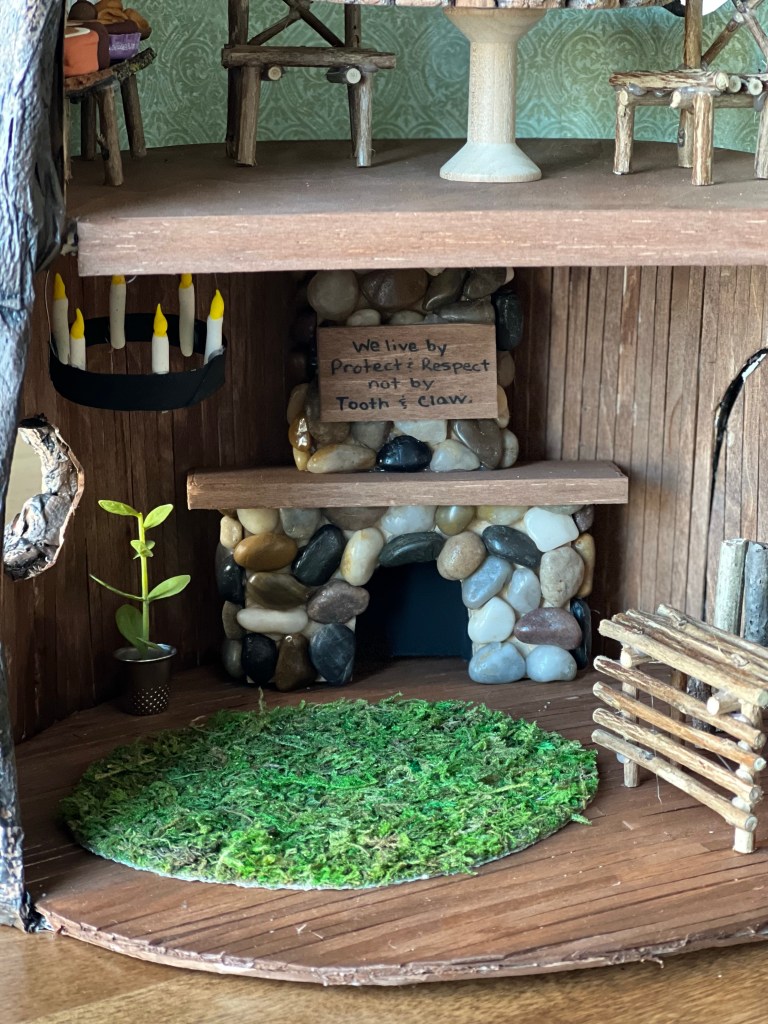
The fireplace was the most fun to make. I cut out some scrap pieces of the paper mache boxes and hot glued together a fireplace base and chimney. I separated the two with some thin pieces of basswood to use as the mantle. I paint stained the wood before hot glueing it all together. Then I hot glued tiny stones all around the fireplace. We also added the hotel’s motto to a piece of wood to hang over the mantle.
My favorite accessory is definitely Mona’s tiny walnut shell suitcase. We didn’t have any empty shells but we did have some whole walnuts. So we just hot glued a piece of black embroidery floss for the handle and painted a tiny heart on the side. My girls also suggested we make Mona a tiny necklace with a key hanging on it. Believe it or not we already had the tiny keys. My girls got them a few years ago in the scrapbook section of Hobby Lobby. It also came with larger keys. So they made themselves key necklaces to wear for the Literature Fair too.
While this project was the most time consuming thing we’ve ever made, it’s also my favorite. Now that my girls are older it so fun to do things like this with them. We all had a blast making this little hotel. I almost want to make another 😆 I hope my directions are easy enough to understand. Feel free to ask me questions about anything! And if you try to make one I’d love to see! Please tag me on Instagram, @withhisgrace.

This is amazing! Really great job!
LikeLike
Where do I find the book. So sweet
LikeLike
Anywhere books are sold! Here’s an Amazon link:
https://amzn.to/3X9Ab4j
LikeLike
I absolutely love this!! We read Heartwood Hotel for a home school book club about a year ago. We might try to do this! Thank you so much for sharing!!
LikeLike
I believe my daughter attended the Lit Fair with your daughters… seeing your house sparked an intense love of reading in my daughter and her friends. They’ve wanted to read the books together, have a book party, and create their own Heartwood Hotel as well. Thanks so much for inspiring my daughter to read something besides graphic novels and get her creative juices flowing!
LikeLike
I am just finding this now in July of 2024, but I’m going to give this project—and that book!—a try really soon. You did a great job; thank you for sharing!
LikeLiked by 1 person
looks so beautiful ❤️❤️❤️❤️
LikeLike