

Recently my daughters participated in a biography fair. They had so much fun researching and working on their project.
What Is A Biography Fair?
Homeschoolers choose a person from history to research and create a biography display and a small oral presentation. They can add anything they would like to their biography display: a tri fold display board, diorama, written report, Lego creations, art, crafts, 3 dimensional displays, photos, lapbooks, even dressing their person from history. One year a child had a power point presentation!
Is This Through a Co-op?
This particular fair isn’t put on through a co op, just our local homeschooling community. It’s such a fun way for homeschoolers to get together, learn new things, and even practice talking in front of a crowd. We hold the fair at a local church’s gym. Rectangular tables are set up in a U shape. Each child sets up their presentation display on the tables. Then everyone walks around the room to look at the displays. Children may do a small speech if they like. There is no competing or judging for the fair and there are no prizes or awards. This is just an opportunity for children to do a fun research project, display what they’ve learned, and maybe practice public speaking. It’s a very laid back event. This year we have about 30 children participating. My girls and I are so excited to see what everyone is presenting this year!
How to Find a Biography Fair Near You
If you would like to find something similar in your area I would suggest searching local homeschool Facebook groups. I am in several for my area. In one particular group I’m in, some mothers organize these fairs that are held at a local church. It’s not affiliated with the church. But the church is so gracious to always let us use their space for the fairs. We also do a Literature Fair. Children read a book and create a display and presentation on the book and the characters. One of my favorite fairs we do is an International Fair. Each child chooses a country to research. At the fair children each get a passport and as they “travel” to different countries they get a sticker or stamp of that particular country. The presentation can consist of display board, artwork, crafts, photos, books, recipes native to the country, and children can even dress up. We also hold a Valentines and Halloween party at the same church. It’s such a great option for homeschoolers to get together without going to a weekly co op.
Another place to check for homeschool fairs is your local library. Our library has monthly homeschool classes as well as a science fair at the end of the year. My oldest daughter has participated in the science fair twice and had so much fun each time. We’re hoping to join in this year too.
If you don’t have anything similar in your area I would encourage you to put one together! The planning is very simple. All you need is a location. Most churches will allow you to use their gyms or multi use spaces for free. Also check with your local library for spaces/ rooms to use. Local parks are another option for free locations. Just make sure to find one with picnic tables for displays. Then just plan a day and time and post on your local homeschool group on Facebook.
Our Biography Subject
We actually signed up pretty late for the fair. So a lot of the more well known historical figures were already taken. At first we thought about researching someone from the time period we’ve been learning about in our homeschool. But the girls didn’t seem very excited about any of the options.
We decided to research Maria Sibylla Merian. I remembered a few years ago when we were learning about butterflies, I got a book about her from the library. It was a long book so we didn’t end up reading it. I was vaguely familiar with her but, we didn’t know too much about her when we started the project. We enjoyed learning more about her through the research process.
Maria Merian was an artist and entomologist (before that was even a word) in the 1600s. She was one of the first people to discover metamorphosis. Many people in that day believed insects were evil and spontaneously generated out of the mud and decaying fruit. At the age of 13 she collected a silkworm and the plant it was on and placed them in a jar to observe. She soon realized it turned into a moth. This is when her research on insects began. Throughout the years she observed many, many more insects and other small creatures.
Her stepfather, a floral painter, taught her everything about art and painting as she got older. When Maria observed caterpillars she would always paint them on their host plant along with the whole life cycle; egg, caterpillar, cocoon, and butterfly or moth.
She traveled to South America when she was older and observed many insects and creatures never seen before. She published several books on her findings from throughout the years.
Beginning our Research
To begin the research I checked out all the books I could find through my local library. I also purchased one book that I had looked through before and thought we would enjoy it to keep. Here are the books we loved:

The Girl Who Drew Butterflies: How Maria Merian’s Art Changed Science by Joyce Sidman – This is the book I purchased and I’m so glad I did! It was my favorite! It is a longer book so I read aloud a few chapters a day. This is a more story like telling of her whole life. My girls really enjoyed it. Especially all of the pictures and maps inside. I loved all of the beautiful quotes from Maria throughout the book.

Summer Birds by Margarita Engle – This is a perfect book for younger children. It gives a simplified history of Maria. And the illustrations are so sweet!

Bug Girl: Maria Merian’s Scientific Vision by Sarah Glenn Marsh – This is great option for children. This book gives a more detailed story of her life, but the story is still easy enough for children to follow along.

Maria Sibylla Merian: Artist | Scientist | Adventurer by Sarah Pomeroy – We didn’t get a chance to read this whole book, but we looked through at all the pictures. It seems like it is geared for older children. I’ll be reading it myself though. We’ve all been so fascinated with Maria!
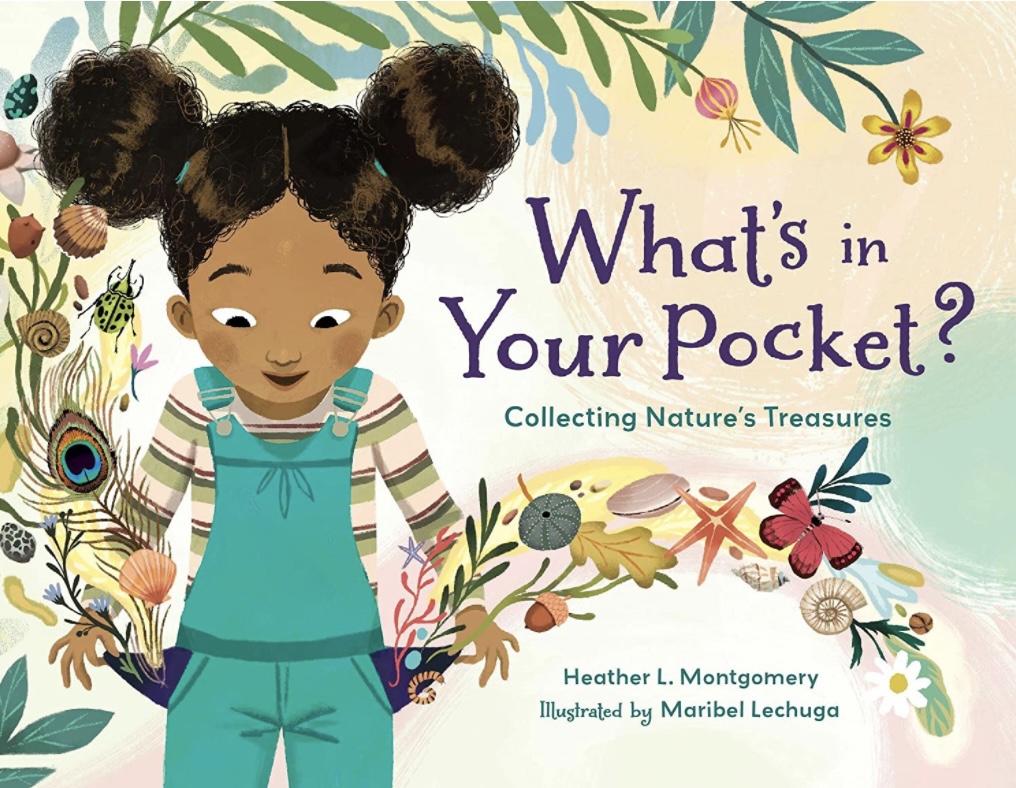
What’s In Your Pocket? Collecting Nature’s Treasures by Heather Montgomery – This book introduces 8 scientists and naturalists who collected nature treasures when they were young. Collecting nature treasures taught them how to observe classify and discover many things when they were older. This book gives very short, simplistic biographies of each person. It’s a great start for a study on naturalists!
Favorite Things We Learned
I was absolutely fascinated by Maria! We all loved reading and learning all about her. We agreed, our favorite thing was learning about how she viewed insects at a time when everyone thought they were evil. She was so intrigued and curious about them. She wanted to learn as much as she could about where they come from, what they eat, how long they live. She loved observing their intricate details. Our absolute favorite quote she said is,
“One is full of praise at God’s mysterious power and the wonderful attention he pays to such insignificant little creatures… thus do not seek to praise or honor me for this work, but rather God, glorifying him as the creator of even the smallest and noblest of these worms.”
– Maria Merian
Creating the Display Board
After reading through the books we started on our project. We used this white tri fold display board we found at Michael’s. We perused the aisles to find things to use to decorate the board. We found these beautiful die cut insect stickers and thought they would be perfect. We chose a card stock pack to match some of the same colors from the stickers.
We used my cricut to cut out letters for her name, life span, and a few titles. If you don’t have a cricut and don’t want to cut out letters, there are many colors and styles of precut letters for display boards. Here is one option. If you’re looking for other styles and colors just search poster letters on Amazon. You can also find these at craft stores like Hobby Lobby and Michael’s. This is a fun poster making kit that includes letters, stencils, markers, paint, glitter glue, borders and shapes, and glue dots.

We decided to write a short biography and make a simplified timeline of her life. After reading the books I would ask my girls to narrate about what they’ve learned about her. When writing her biography we used a combination of books and resources to take from. My oldest daughter wrote some of the biography and I filled in the gaps. Then we used the timeline from one of the books and simplified it since we didn’t have too much room to work with on the board.

We also added her portrait and some of her artwork. My girls hand wrote the titles of her artwork and quotes. We divided the work evenly among them both. We placed all of the typed and written work as well as her portrait and artwork on colored cardstock to make them stand out more. We used a glue stick to attach all of the letters and papers to the display.

Creating the Display Table
Maria collected caterpillars and their host plant and placed them in mason jars with gauze on the top to observe them. So my girls made little caterpillars out of polymer clay and attached them to some faux greenery. They also added some of these butterflies from Amazon. This is also a fun option that includes the whole life cycle.

Maria made her own paint throughout her life. One particular kind was made from crushed lapis lazuli, a beautiful blue hued stone. So we placed a piece of lapis lazuli beside a small mortar with some crushed blue chalk pastel inside. We decided not to try and crush one of our favorite stones from our rock collection.

Maria used a magnifying glass to observe all the tiny details on her subjects. So we added a magnifying glass to the display table.

I purchased this coloring book, Maria Merian’s Butterflies Coloring Book: Drawings from the Royal Collection. It consists of her artwork in full color on one page and the next page is a black and white version to color.

I decided to copy the black and white versions so my girls (and me) could each color them. I copied them on cardstock paper so they could use watercolor paint on them. The artwork is so beautiful! I just want to frame them all! My girls decided to each paint one of her drawings to include on the display table. They glued them to some gold cardstock as a frame.

Maria’s father owned a publishing shop. In those days artists would engrave copper plates with designs and drawings to turn into prints. I found this thin copper roll and metal embossing tools at Hobby Lobby. I’m not sure why the price is higher online. I only paid $6.99 for the copper roll.

We cut a piece of the copper and taped a coloring sheet on top of it. Then used the thin lined embossing tool to trace. After tracing the whole page we took the coloring sheet off and used the thicker embossing tool to go over all the lines. This made the “engraving” stand out more. It was such a fun and easy project! My girls are already wanting to make more designs.

For each display item my girls hand wrote little cards to explain each item. We glued them to a folded piece of cardstock so they would stand upright.
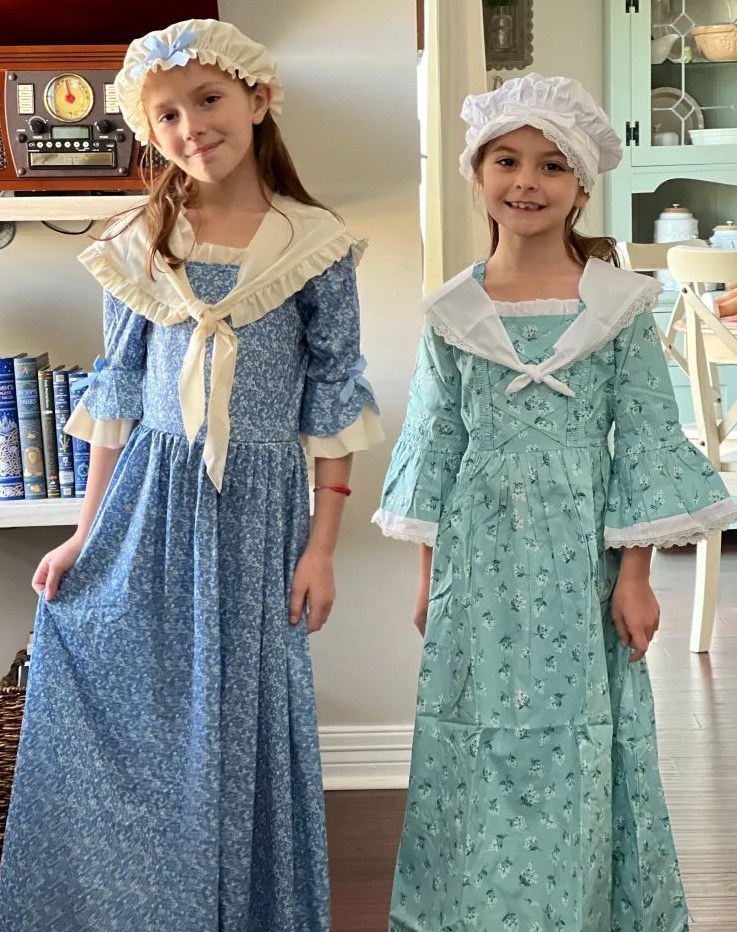
Costumes
My girls really wanted to dress up as Maria for the fair. I wasn’t able to find exact clothing Maria would have worn. But I found some cute (and cheap) colonial style dresses on Amazon. I got my girls different styles because of the available sizes offered. I was trying to spend the least amount of money as possible since I knew they would probably only wear them for this event. As it turns out, they love the dresses and have worn them everyday since they got them in the mail. Here are the links to Emma’s dress and Olivia’s dress. You can also search colonial dresses for girls on Amazon for more options. I would have liked to have found some white aprons for them to wear but I didn’t want to spend any more money.
Since Maria was an avid painter we added paint palettes and paint brushes. We taped colored construction paper to these wooden palettes so it looks like paint but without the mess.
Presentation
When we got to the church the tables were all set in a large U-shape. We picked a table in the middle and set up the display. After everyone was finished setting up we walked around the room seeing all the displays. It was so fun seeing who everyone researched and their display boards.

Then it came time for the oral presentations. It’s not required and some children didn’t want to speak in front of the crowd. Understandably so! There were 30 children who participated, along with siblings, parents, and grandparents who came for support.
When we first started this project Olivia did not want to do any kind of presentation. But Emma was so excited to do a small speech. She read off the biography page while Olivia stood beside her. She did such a great job speaking!

We learned a lot of new things about various historical figures. My girls said they had so much fun and they can’t wait to do the international fair in a few months. Let me know if you have any questions about the fair!

Thank you for taking the time to write all this out. I’m excited to try and incorporate the idea of a Biography Fair into our homeschool class next school year!!
LikeLike