The Spring session for Tinkergarten is coming to an end. (insert sad face) I always like to give pictures of our explorers as a end of the season gift. Last Fall I created stick picture frames for their photos. This season at Tinkergarten we made seed bombs using paper pulp, seeds, and flower petals. The paper pulp reminded me of when I had made paper in the past. So I decided to make some handmade paper for picture frames. Making paper is such a fun and easy handicraft and I was excited to make some again. I didn’t have a mold (frame with a screen attached) and deckle (cover frame) so I searched our scrap wood and found some perfect boards for creating them. (You can also use old picture frames) I had my husband make me 2 8×10 wooden frames. He used staples and wood glue to hold it all together. I went to Home Depot and bought a roll of window screen.
Here’s what you’ll need to create the mold:

To create the mold I measured a piece of screen and cut to fit. I attached the screen using staples. It’s important to start in the middle on one side, then in the middle on the opposite side. You want to make sure the screen is super tight. Otherwise you might have sagging in the middle. Next staple the side starting in the middle again. Then the middle on the opposite side. Once you get the middle stapled on each side staple the middle between the staple and the outer edges.


After stapling the sides place duct tape over the screen and frame. Don’t go past the inside frame. The duct tape will help smooth the cut wire so you won’t get a bunch of paper pulp stuck in between. Also the wire is super sharp so be careful!


Once the mold is finished you can add the deckle on top. This will not be attached in any way. You’ll just hold the deckle on top of the mold when you’re sifting the paper pulp. Here’s what it will look like:


Now you’ve made a mold and deckle! Yay! On to the paper pulp! You can use any kind of paper you have on hand. I used a combination of drawing paper, printer paper, and watercolor paper. I chose to use all white, but you can also use colors too! Thankfully I have a paper shredder so I just put the paper through that. You can also tear or cut the paper into small squares. Once you’ve shredded the paper, it’s easier to have the paper soak for a few hours if you can. I didn’t have the time to soak for this tutorial though. All you need to make the pulp is a blender or food processor, shredded paper, and water. I typically just eyeball the amount of water used. The pulp should be the consistency of chunky applesauce? Yeah that sounds about right. It’s okay if you have some chunks of paper in the pulp! It will just add more texture. Of course if you want a smooth paper you probably need to keep blending and adding more water.


After making the pulp transfer it to a large enough container to fit your mold and deckle. Once you pour your pulp in add a lot of water too. You need enough to be able to submerge the mold and deckle and have a couple of inches on top of that. After adding the pulp and water you may add flower petals, leaves, grass, etc. For this tutorial I picked some of our pretty wildflowers that are growing in our backyard. Now it’s time to make paper! Start by holding the deckle on top of the mold and insert it into the water at an angle. Gently move the mold and deckle side to side and front to back to get and even distribution of pulp on the screen. Then slowly lift it out of the water and let the water drip out. At this point you can tilt it to get more water out.


Now take the deckle off of the mold and flip the mold paper side down onto a towel. It’s important to place it on a flat surface otherwise the paper will be embossed with any unevenness. (When I made the first batch of paper I placed a towel on my outdoor table with slats so I had some paper with lines on it.) For this tutorial I placed an old mdf board on the table first then a large towel over it. Once you flip the mold onto the towel begin to squeeze the water out. I use my hands first to get the majority out. Then a sponge and a microfiber cloth. It’s best to use one of those large sponges typically used for grouting tile but I didn’t have one so I just used a kitchen sponge.


After getting most of the water out, carefully remove the mold from the paper. The paper should stay on the towel. If it sticks to the mold it might still be too wet. Place the mold back down and press a towel down to get more water out. Once the mold is off lay a dry microfiber cloth over the paper and roll out even more water using a rolling pin.


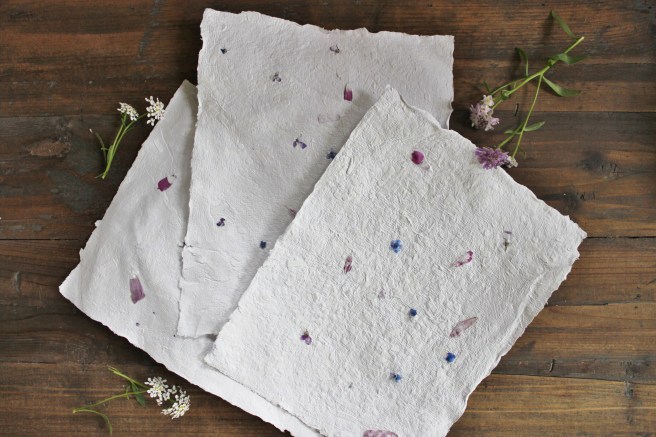
Now just let the paper dry! You can make more sheets and create a little assembly line too! For this tutorial I just made 3 pages. After the paper has dried some and can be easily picked up without tearing, remove the towel from underneath and let the paper sit out overnight to dry.


You just made paper! And I’m sure it’s pretty! There are so many ways to create different types of paper depending on the paper you use and add ins. You can also add food coloring to make colored paper! I plan on making a lot of different types. Now I just need to figure out what to do with all the paper! Let me know if you have any questions! And show me your paper too! Use the hashtag #whghandmadepaper so I can see all of your lovely creations!